
Set up your organisation before you start selling
New founders land on organisation settings first and stay there until the required business details are filled in, so quotes, invoices, emails, and PDFs use the right company information.
After that, you can create another organisation from the switcher for a separate customer base or your own training workspace.
First login guide
Organisation Settings
Why this is the first page you see
New organisation founders are directed to Organisation Settings after sign-up. Until the required organisation details are complete, BeagleCRM treats the organisation as still being set up and brings you back to this page each time you log in.
This is expected behaviour. Complete the required address details, save the page, and future logins will take you into the normal CRM experience.
- Address line 1 for your organisation.
- Postcode for your organisation.
VAT details, numbering, logo, terms, payment details, and email inbox settings can be completed at the same time so documents and customer emails are ready from day one. Once you add a VAT number, VAT will be added automatically to your invoices and quotes. If your organisation de-registers for VAT, remove the VAT number; previous records stay the same, and new quotations and invoices will be VAT free.
What to check on the page
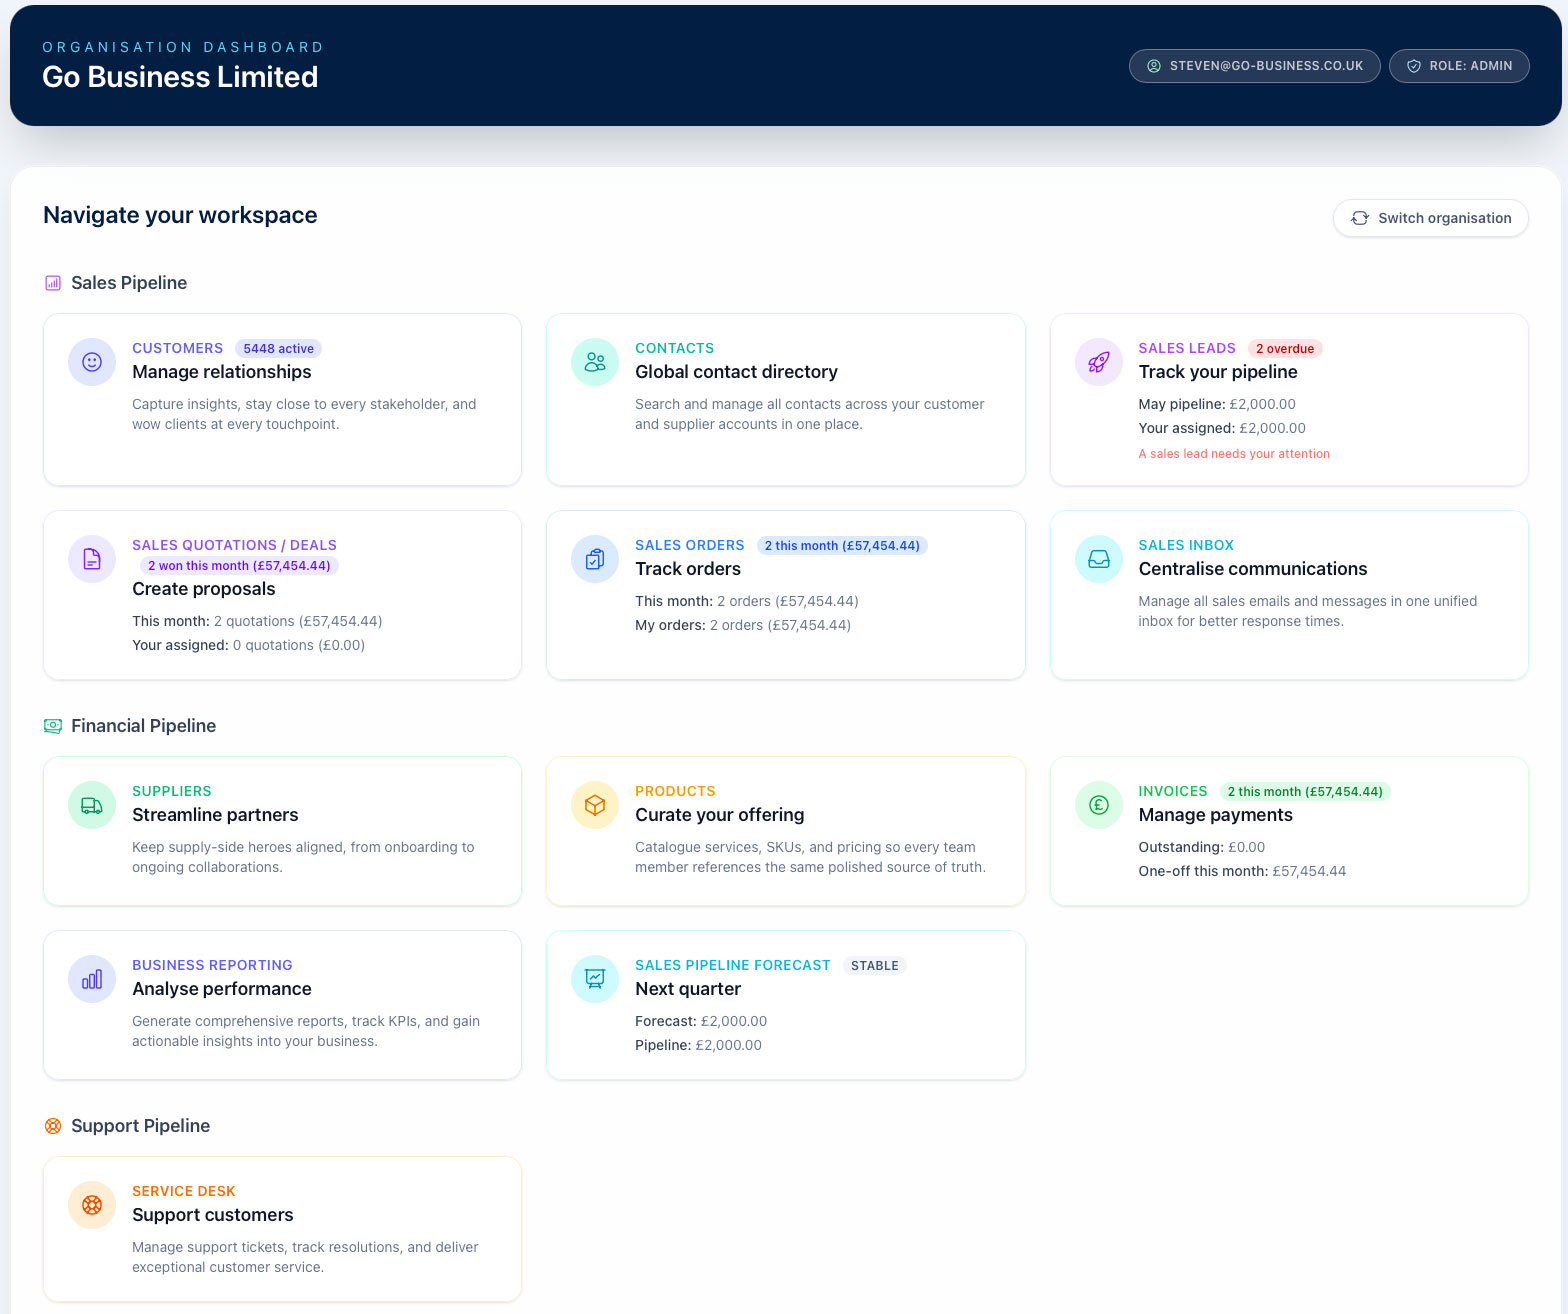
Organisation Settings is the control room for the workspace. It decides how your company appears on PDFs and emails, how document numbers are generated, how VAT and invoice defaults behave, and how sales and support intake are routed.
Business profile and support ID
Confirm the organisation name, URL slug, Address line 1, Postcode, city, county, website, Companies House number, and VAT number. The Support ID is the organisation UUID support may ask for when investigating a workspace issue.
Logo and document branding
Upload a PNG or JPG logo up to 5MB. The logo is used on quotation PDFs and other customer-facing documents, so check this before sending your first quote or invoice.
VAT and business identity
VAT details, numbering, logo, terms, payment details, and email inbox settings can be completed at the same time. Once you add a VAT number, VAT will be added automatically to your invoices and quotes. If your organisation de-registers for VAT, remove the VAT number; previous records stay the same, and new quotations and invoices will be VAT free. The standard VAT rate becomes the default for new products and line items.
Document numbering
Quote, sales order, invoice, and credit note prefixes and next numbers are configured here, alongside project reference numbering. Each section previews the next number before you save, so review these before live documents are created.
Invoice and payment setup
Set automatic invoice reminders, the reminder stop count, default payment terms, payment terms text, and the invoice query email. The query email appears on invoice PDFs, invoice emails, and payment reminders.
Terms and customer-facing notes
Terms of sale are printed on quotation PDFs. Invoice notes are printed on invoice PDFs only, which makes them the right place for bank details, payment instructions, or invoice-specific wording.
Sales process setup
This area is more than a short checklist. It controls terms of sale for quotation PDFs, lead statuses, lead sources, sales inbox routing, and customer care inbox configuration. Changes here affect how users create leads, how the pipeline is valued, where sales emails are linked, and how support emails become Service Desk cases.
Lead statuses
Lead statuses define the stages in your sales process. The default setup is New, Contacted, Qualified, Quotation Created, Quotation Sent, In Negotiation, Won, and Lost. You can rename stages, reorder them, add new stages, deactivate old stages, and save the list independently from the rest of organisation settings.
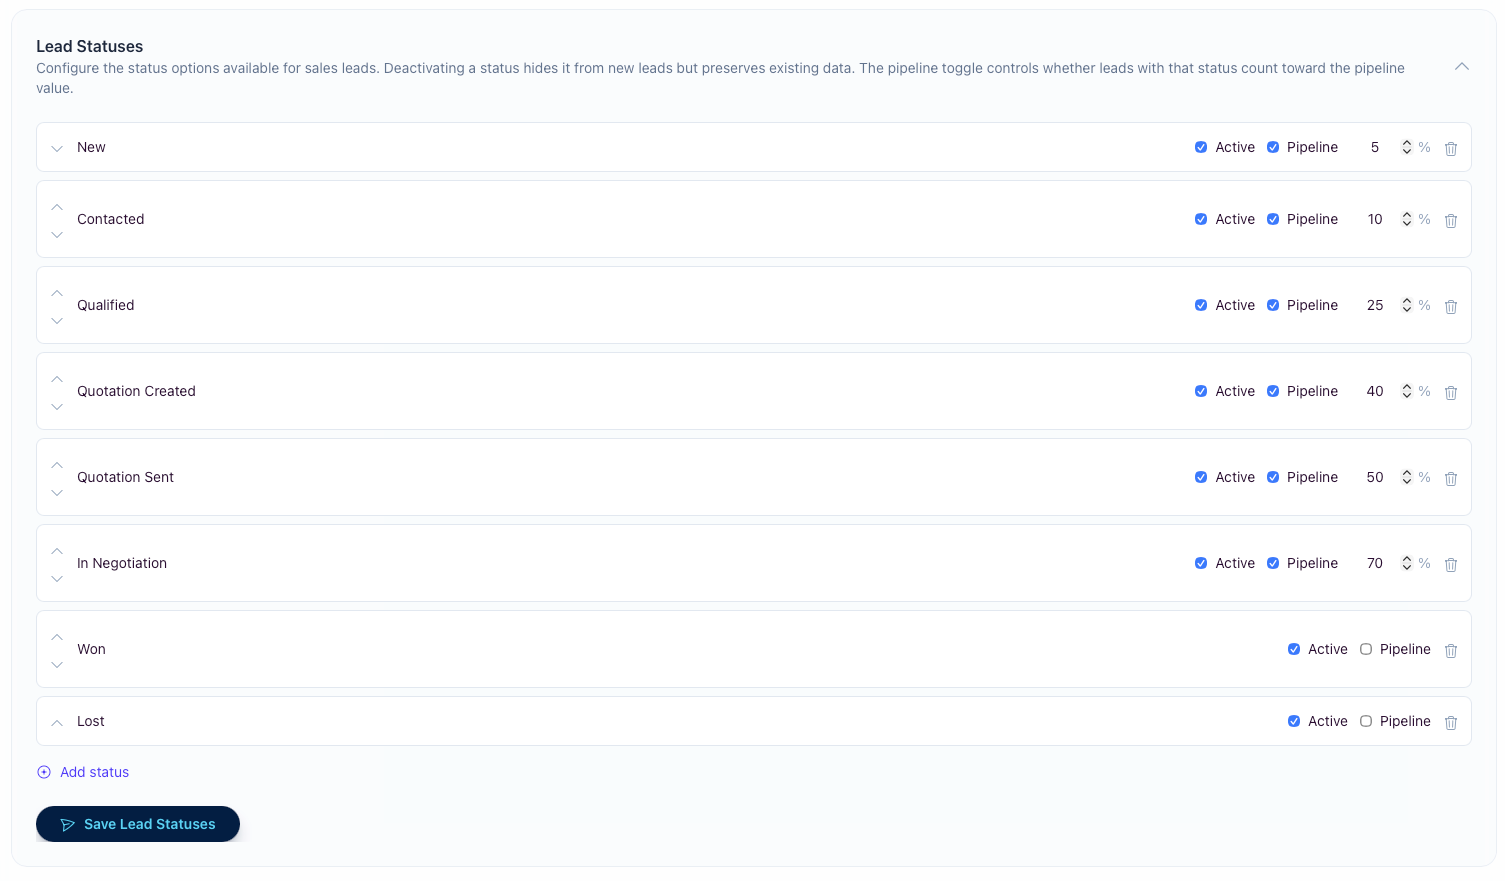
Active vs inactive
Inactive statuses are hidden from new lead choices but existing leads keep their stored status. Use inactive when retiring a stage without rewriting historical lead data.
Pipeline and probability
The Pipeline toggle controls whether leads in that stage count toward pipeline value. Pipeline stages also carry a forecast probability, such as 5% for New, 40% for Quotation Created, or 70% for In Negotiation.
Removing statuses
A status already used by existing leads cannot be removed. The trash button is disabled for those rows, and the app also checks the same rule when you save. This protects historical pipeline and reporting data.
Lead sources
Lead sources track where opportunities come from. The default list is Website, Referral, Outbound Call, Inbound Call, Inbound Email, Outbound Email, Event, Social Media, and Other. Keep this list broad enough for consistent reporting and use campaign data for short-lived marketing details.
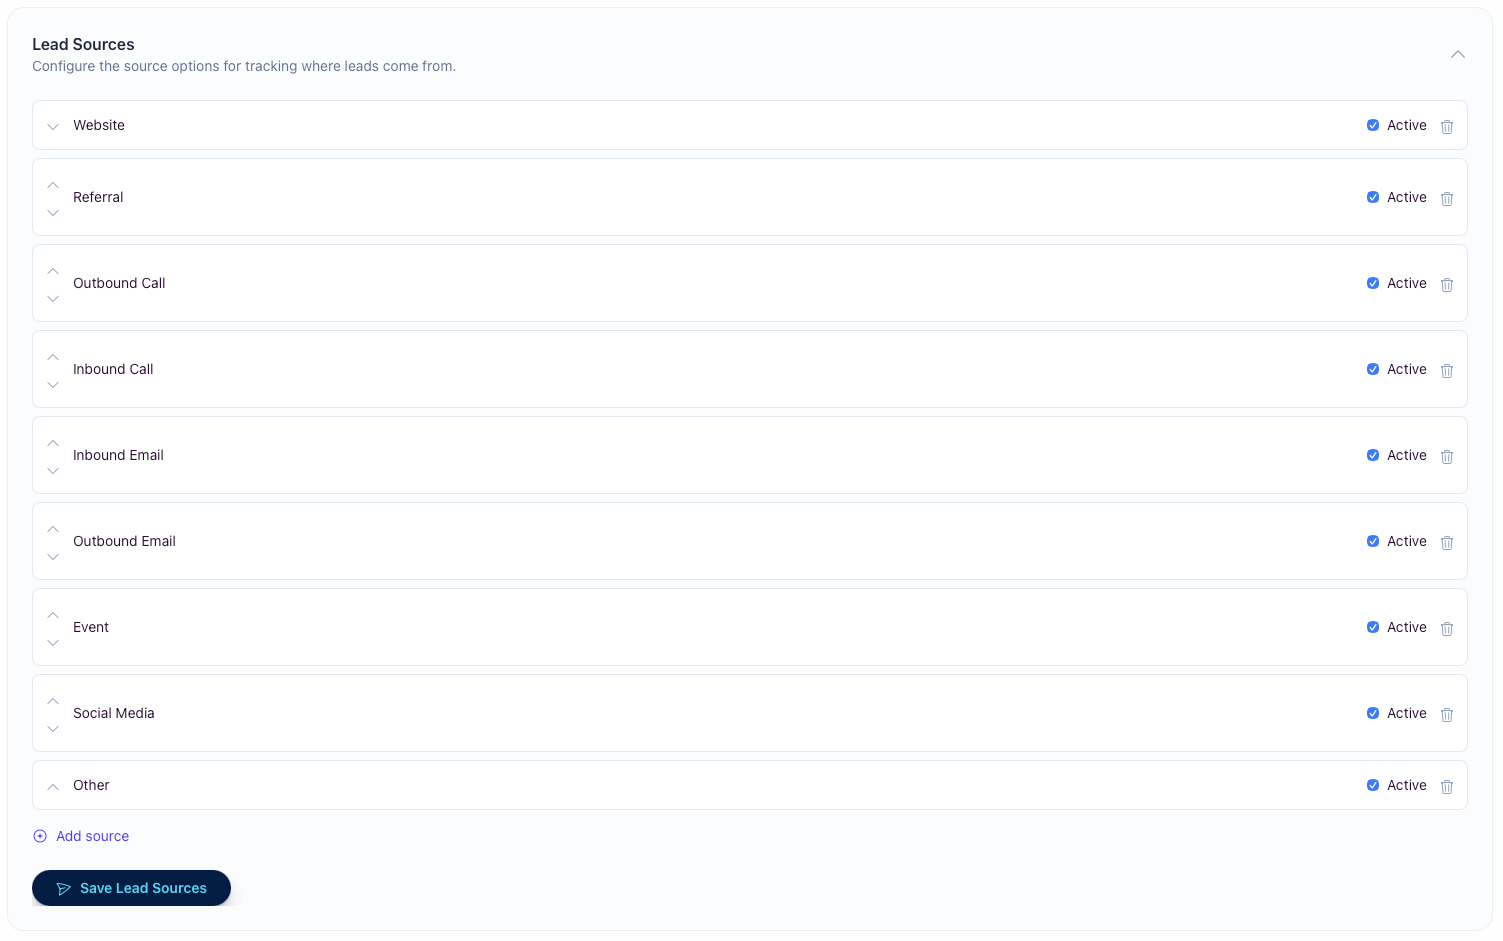
Editing the list
Rename sources, reorder them with the arrow controls, add new options, and use the Active checkbox to hide sources from new lead forms without losing old data.
Removing sources
Sources already used by existing leads cannot be removed. Deactivate the source instead when you want users to stop choosing it for new leads.
Sales and customer care inboxes
Sales inbox
Connect Microsoft 365, Google, or IMAP for the sales inbox. Emails received here are auto-linked to customers and create follow-up tasks, helping the team keep sales conversations connected to CRM records.
Customer care inbox
Connect Microsoft 365, Google, or IMAP for the support inbox. Emails received here create support cases in the Service Desk, preserving the original message as the starting point for the case workflow.
AI customer summaries (bring your own Claude or ChatGPT/OpenAI key)
What it does and how to turn it on
On a customer's page you can generate an AI summary — a short brief that digests that customer's notes, activity events and linked emails into the current relationship state, last meaningful contact, sentiment, and any open risks or next steps.
The feature is off until you connect an AI provider. An admin chooses Anthropic Claude or ChatGPT/OpenAI and pastes your organisation's own API key in Organisation Settings. Until a key is saved, the panel simply shows a "Connect an AI provider in Settings" prompt and nothing is ever sent anywhere.
For ChatGPT/OpenAI, this means an OpenAI API Platform key from your OpenAI organisation or project. A normal ChatGPT web login or ChatGPT Plus/Business subscription cannot be connected directly here; OpenAI API billing and ChatGPT subscriptions are managed separately by OpenAI.
Once connected, open a customer and click Generate AI summary (Regenerate to refresh it). The result is cached and shows when it was generated and how many notes and emails it was based on. Managers and admins can generate summaries; the API key itself can only be added or removed by admins. The key is stored encrypted and is never shown again once saved.
Why isn't AI just included in my subscription?
Some platforms bundle AI into the plan. We deliberately don't — and we think our approach is better for a UK business that cares where its customer data goes.
With bundled AI, the vendor chooses the AI provider, the data path and the terms, and routes your customers' data through their own AI account. With Beagle, you connect your own Anthropic Claude or OpenAI key, so:
- Your data goes only to a provider you control — no shared, Beagle-owned AI account sits in the middle.
- You stay the data controller and pick the provider, plan and region that suit you, and you can agree your own terms directly with them.
- You pay your provider directly, at cost — Beagle adds no markup and takes no cut.
- You're not locked in — choose Claude or OpenAI, switch anytime.
- It's genuinely opt-in — nothing is sent anywhere until you switch it on.
It's the same class of AI the big platforms bundle, but on your terms, not ours. The only trade-off is a one-time setup step: an admin creates an account with your chosen provider and pastes a single API key.
Why we use your own key (bring-your-own)
Cost stays yours, with no markup. AI summaries run on your organisation's own Anthropic Claude or OpenAI API account and are billed directly to you by that provider. Beagle adds no per-summary fee and takes no cut — you only ever pay your AI provider for what you use.
Your data, your control. Customer information is only ever sent to the provider under your account, which you control. You remain the data controller for what leaves Beagle and can set your own retention and usage terms directly with that provider — important for GDPR. We never route your customers' data through a shared, Beagle-owned AI account.
Strictly opt-in. Because the feature does nothing until you add a key, no customer data is sent for AI processing unless you have deliberately switched it on. Remove the key at any time and the feature turns off again.
What gets sent, and data minimisation
When you generate a summary, only that customer's notes, activity events and linked emails are sent to your chosen provider — nothing about your other customers, and no more than is needed to produce the summary. AI processing happens one customer at a time, only when you ask for it.
Good to know
- What's sent: only the selected customer's notes, activity events and linked emails — and only what's needed for the summary.
- Where it's processed: this depends on the provider and plan you choose. Standard Anthropic and OpenAI API calls may be processed outside the UK, for example in the US. If data residency matters to you, such as UK/EU-only processing, check your provider's region options and terms, as you are responsible for any international transfer safeguards.
- Training: whether your data is used to train AI models is governed by your own agreement with Anthropic or OpenAI. API usage on standard business terms is generally not used for model training, but you should confirm this in your provider's data-usage terms.
- Accuracy and decisions: summaries — including sentiment and any "open risks" — are AI-generated and may be incomplete or wrong. Treat them as a starting point to help you, not as the sole basis for a decision about a customer.
- The summary itself: the generated summary is cached inside Beagle under your own account and shown with its generation date and the number of notes and emails it was based on. Regenerating overwrites the previous version. Removing your key turns the feature off.
- Security: your API key is stored encrypted, is never shown again once saved, and is only used to send summary requests to the provider you selected. The personal data contained in summary requests is not written to our application logs.
Customer email guide
Invoice & Quotation Emails
What you can customise
When you send an invoice or quotation to a customer, BeagleCRM emails them a short message followed by a summary of the document and the PDF attachment. You can edit the opening message of each email from Settings → Invoice & Quotation Emails. Two rich-text editors are provided — one for invoices, one for quotations.
- The greeting and intro paragraphs at the top of the email.
-
Insert the customer's name anywhere with
{{customer_name}}.
- The summary block (number, dates, item count and total).
- The PDF attachment, sign-off and support/contact footer.
You don’t have to set anything up: every organisation starts with the standard wording already in place, so customers see exactly what they saw before, until you decide to change it.
Multi-organisation guide
More Organisations
After your first workspace is live, open Your organisations to create another organisation. Every organisation is its own workspace with its own customers, pipeline, documents, inbox, and team access.
Create another workspace
Go to /organisations and choose Create new organisation. The form creates a fresh workspace and automatically makes you an admin in that organisation.
Switch between organisations
The organisations page lists the workspaces you belong to. Your original sign-up workspace is highlighted as the Founding workspace, and each card opens that organisation's dashboard.
Using a second organisation for training
If you want a safe place to practise, create a normal second organisation and add your own sample customers, contacts, leads, and documents there. That keeps your live workspace clean while still letting your team learn the real workflows.
Customer setup guide
Adding Customers
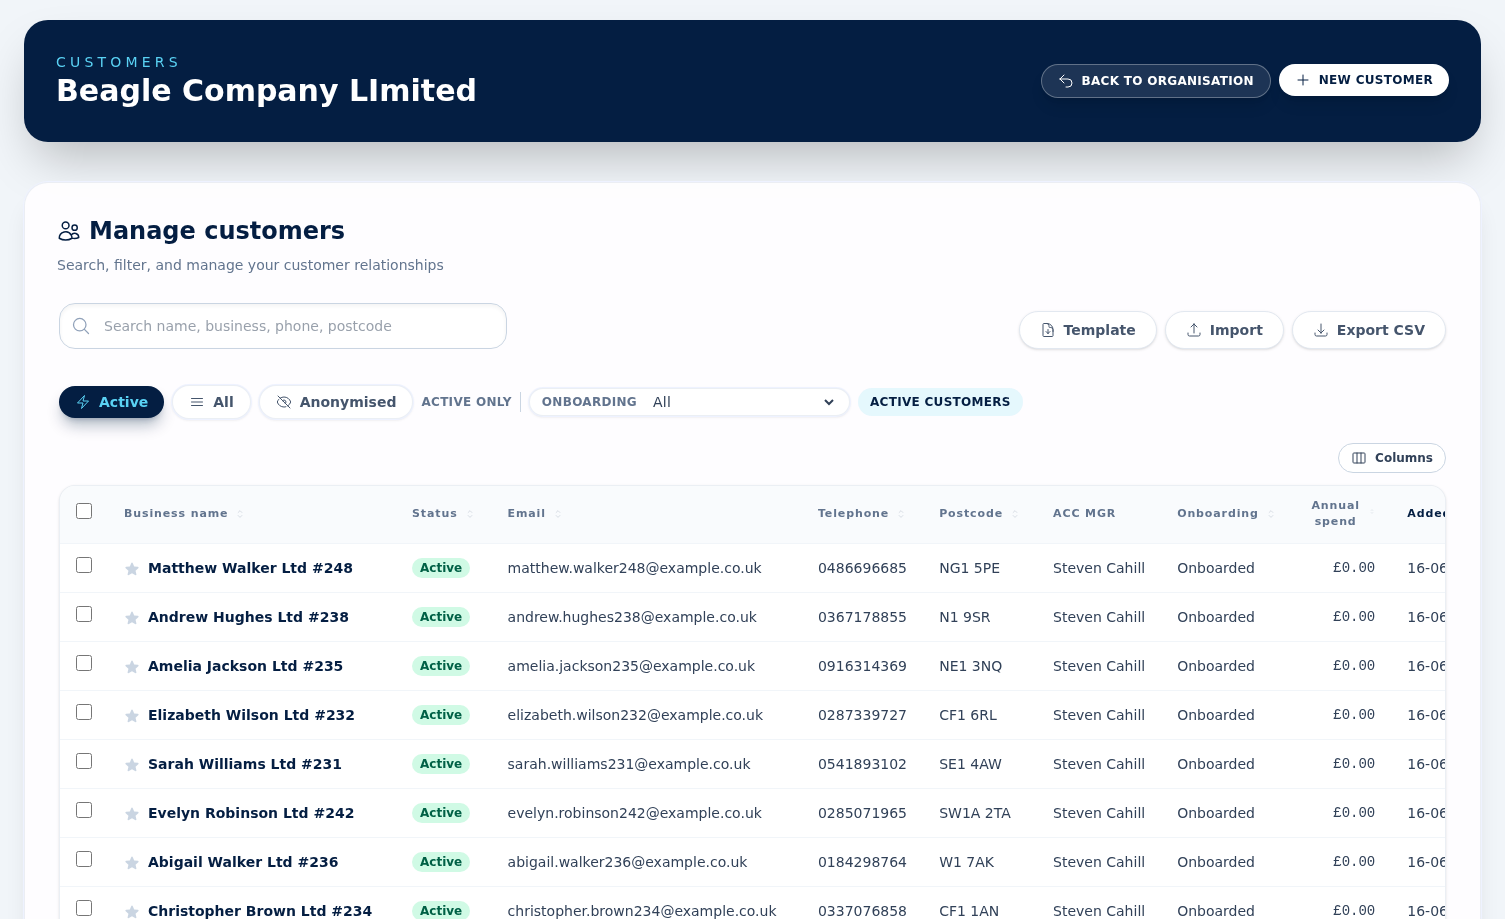
You can add customers one at a time or import them in bulk. The customer screen includes both options, so new organisations can either start clean or bring over an existing customer list.
Add one customer manually
Open Customers and use Add customer to create a new record. You can capture the core details straight away, including customer name, business name, email, telephone, mobile, address, postcode, county, country, and website. Either a customer name or business name is required, and BeagleCRM assigns the current user as account manager unless you choose someone else.
Import customers in bulk
Use Download template to get the current spreadsheet, complete it, then open Import customers and upload the file. Imports use Excel .xlsx files up to 5MB, with a maximum of 250 customers per file — split larger lists into batches.
Details, identifiers, and custom fields
The customer form has tabs for Details, Identifiers, and, when configured, Custom Fields. Use Identifiers for VAT number, Companies House number, and DUNS number. Custom field values save with the customer, so required custom fields must be completed before the record can be saved.
Validation and duplicates
BeagleCRM checks email format, phone numbers, website URLs, county, Companies House number, VAT number, and DUNS number. Email addresses and business names must be unique within the organisation, so duplicate customers are caught before save or import.
Upload, preview, then import
After upload, BeagleCRM validates the rows before anything is created. The preview shows row numbers, key customer details, how many rows are valid, and which rows need attention. Only rows marked Ready are included when you confirm the import.
Download failed rows for review
If any rows fail validation in the preview, use Export errors to download a spreadsheet of the problem rows and error messages. The file is delivered as customers-import-errors.xlsx so you can correct the source data and re-upload it.
Import progress and partial success
Once you confirm, the import runs with a live progress indicator. Valid rows can be imported even if other rows fail, so a bad record does not block the whole batch.
Custom field columns
The customer template includes the standard columns plus one column for each active customer custom field, labelled CF: Field Label. Re-download the template after adding or archiving customer custom fields so the spreadsheet stays in sync with your organisation.
Import template columns
The customer import template includes these headings: Name, Business Name, Email, Telephone, Mobile, Address, Postcode, County, Country, and Website. Any active customer custom fields are appended as extra CF: columns.
Onboarding automation during import
If your organisation has the Customer onboarding automation enabled, the preview step lets you choose how imported customers should enter onboarding. The default is Skip onboarding for imported customers, which marks each valid imported customer as Onboarded and creates no checklist tasks.
Run onboarding for an import batch
Choose Run onboarding for imported customers only when the imported customers should go through your normal checklist. Those records stay in Draft and the default onboarding template creates checklist tasks for the batch.
Flagging VIP customers
Tag any customer as a VIP to make them easy to spot across the workspace. There are three ways to set it:
- In the customer grid, click the star to the left of the business name. Gold = VIP, grey = not VIP.
- On the customer detail page, click the large star next to the customer name in the hero.
- In the customer edit form, tick the VIP customer checkbox in the Details tab.
VIP is purely a visual flag — it does not change pricing, automations, or permissions. Use it to draw the team's attention to strategic accounts.
Search, filter, and export
The customer list searches name, business, phone, and postcode. Filter by Active, All, onboarding status, and, for admins, Anonymised. Use Columns to show or hide table columns, sort the list, change page size, and export the current filtered view as CSV.
Active, anonymised, and deleted customers
Admins can mark customers inactive when a relationship pauses. Admins can also anonymise a customer for data-protection requests; anonymised records are hidden from normal lists but can be viewed through the admin-only Anonymised filter and restored by an admin if needed. Permanent deletion is admin-only and has its own confirmation screen.
Bulk actions
Select one or more customers from the list (checkbox column on the left, or the header checkbox for "select all on this page"). When at least one row is selected a sticky bar appears above the table with four actions:
- Assign owner — reassign the account owner across every selected customer. Manager or admin.
- Add to campaign — push every selected customer as a campaign member. Idempotent: re-running on the same set won't create duplicates.
- Archive — set every selected customer to inactive. Reversible from the customer's edit screen.
- Delete — permanent removal. Admin-only and requires a typed confirmation.
Batches up to 25 rows run in the foreground and the page refreshes when done. Larger batches queue a background job; a flash banner reports progress and a final summary with the success/failure split. Selection clears whenever you change a filter, sort, or paginate.
Heads up: permission gates apply per row. If a row fails authorization mid-batch the foreground path rolls the whole batch back; the background path skips that row and keeps going.
Marketing consent
Each customer record carries per-channel marketing consent: email, SMS, and post. Editing the customer surfaces a
Marketing Consent panel with the three toggles, a Lawful basis
dropdown (Consent, Soft opt-in, Legitimate interest, or Contract), and a free-text
Consent source / provenance
field. The provenance label is required whenever any channel is opted-in — if you
leave it blank, the system auto-fills
staff: <your name> @ <ISO timestamp>
on save and writes that label into the per-event audit trail.
Every flip (opt-in or opt-out) writes an append-only row to the consent audit log with channel, action, lawful basis, IP, user-agent, actor, and the source label. Audit rows are never updated or deleted — the database role prevents it. This is what you'd show a regulator if asked to prove how consent was captured.
Double opt-in (optional). Turn on Settings → Marketing consent → Require confirmed opt-in for a stricter, provably-consented list. With it on, anyone newly marked as email opted-in is sent a one-off confirmation email and is held back from campaigns until they click the link; people who haven't confirmed are skipped. Off by default — soft opt-in is lawful under UK PECR for existing-customer relationships.
CSV import: the customer import template has five additional columns — Marketing Email Consent, Marketing SMS Consent, Marketing Post Consent, Marketing Consent Basis, Marketing Consent Source. The Source column is required for any row with a true opt-in or the row is rejected at preview time (no silent fallback). Filename + row number are recorded into the audit evidence.
Tags
Tags are a shared per-organisation pool of labels that flow across customers, contacts, and leads — one chip, one colour, one rename point. Use them for whatever the fixed columns don't capture: industry vertical, office region, campaign cohort, "needs onboarding call". From the bulk action bar pick Add tags or Remove tags to apply to many rows in one go.
Admin: tag CRUD lives at Settings → Tags. Pick from a 10-colour palette, add an optional category to group related tags, archive to hide without losing history, delete (admin-only) cascades through every tagged record.
Duplicate detection
Same customer entered three different ways (web form, CSV import, "couldn't find it in search so I re-created it") is the most common cause of stale activity and triple-sent marketing emails. BeagleCRM flags possible duplicates as you type and surfaces an admin scan list of pairs already sitting in the database.
Four match strategies run on every check: exact email (case-insensitive), name similarity (fuzzy trigram match on business or person name), phone number (compared on the last 10 digits, so +44, 020, and 02079460958 all collide), and postcode + name (a strong UK B2B signal for "same office of the same company"). Each match shows up as a coloured badge with a confidence score.
Admin: Settings → Duplicates lists every customer or contact pair the engine spots in your org. Click Compare & merge to open the side-by-side view: pick the winner's value for each field where the two records differ, hit confirm, and the loser is deleted with every child record (leads, quotations, sales orders, invoices, notes, tasks, consent events, taggings, custom fields) re-parented to the survivor. Merges write a dup_merge audit row with the full pre-delete snapshot. Manager + admin can view the scan; admin-only can confirm a merge (because the loser record is deleted).
Guided onboarding workflow
Customer Onboarding
Onboarding turns customer setup into a guided, measurable workflow. Every customer moves through five statuses — Draft, Needs contacts, Needs billing, Needs success plan, and Onboarded — and BeagleCRM automatically tracks where each one is up to.
Onboarding panel on the customer profile
Open any customer and look for the Onboarding panel in the right column. It surfaces the current status pill, a progress bar, the missing-information checklist (decision-maker contact, billing email, billing address, and an open onboarding task), the next three open customer tasks, and any active risk indicators such as overdue onboarding tasks, no decision-maker contact, unclear success criteria, or no recent onboarding progress. Admins and managers can click Start onboarding to launch the wizard.
The onboarding wizard
The wizard walks an account owner through six steps. Each step writes incrementally, so closing the browser mid-flow leaves a partially-completed customer rather than losing the work.
- Confirm profile — sanity-check the basics.
- Contacts — open the contacts page and add the right customer contacts. A decision-maker contact clears the checklist risk.
- Billing — capture or correct the billing email, address, and postcode.
- Goals — record what the customer wants to achieve in the success plan or a customer note, then continue the wizard.
- Checklist — review the auto-generated onboarding tasks and assign owners.
- Done — flip status to Onboarded and stamp the completion time.
Where the checklist comes from
Every organisation is seeded with a Default Onboarding template when the organisation is created. The template lists the steps a new customer can follow: confirm profile, add core contacts, confirm billing, capture success goals, schedule the kickoff call, and a final completion check.
When the Customer Onboarding automation rule is enabled, a newly-created customer receives real tasks from the current default template. Required template tasks become required onboarding tasks, optional template tasks remain optional, due dates are calculated from each task's due offset, and assignees are set to either the account manager or the creator, depending on the template task. The import flow skips onboarding by default and marks imported customers as onboarded; choose Run onboarding for imported customers only when the imported records should receive checklist tasks.
Editing the template
Admins and managers can edit templates from Organisation settings > Customer onboarding > Templates or at /orgs/:org/onboarding/templates. From there you can rename the default template, add or remove tasks, mark tasks as required or optional, set a default due offset for each task (for example, "due 3 days after customer creation"), choose whether the task goes to the account manager or the user who created the customer, and reorder tasks with the up/down arrows. You can also create additional templates and promote one of them to default. Only one template is default at a time, and the default template cannot be deleted.
Status updates automatically
Onboarding status is recomputed when customer details, contacts, and success-plan details change. A customer moves out of Draft as the required pieces are added: contacts first, then billing email, billing address, and postcode, then a success plan with a goal. Each transition is recorded as a customer event, so the activity timeline shows how the customer progressed.
The customer can become Onboarded in either of two ways: an admin or manager completes the wizard's final step, or the customer already has the required contact, billing, and success-plan data when those records are saved. Onboarding then stamps the completion time and stops nudges.
Customer success plan
Below the onboarding panel, every customer profile has a Success plan section. Capture the goal, the success criteria, and a target date, then add milestones and tick them off as you go. The plan records who last updated it, and the success-plan goal is one of the gates used to complete onboarding. The success plan stays with the customer beyond onboarding so account owners can keep tracking outcomes long after the customer is live.
Reporting dashboard
The onboarding dashboard is available from Organisation settings > Customer onboarding > Dashboard or at /orgs/:org/onboarding/dashboard. Members, managers, and admins can view it. It summarises the whole organisation: total customers, how many are onboarded, draft count, in-progress count, overdue required onboarding tasks, average days from customer creation to onboarded over the last 30 days, and a live list of overdue onboarding tasks across customers. The dashboard reads from a daily snapshot computed at 01:00 UTC and recomputes on demand if no snapshot exists yet.
Filtering by onboarding status
On the customer index, the Onboarding filter at the top of the page lets you narrow the list to a single status — useful for spotting every customer still stuck in Needs billing, for example. The filter is reflected in the URL so you can bookmark or share the view.
Automatic nudges
Customers older than seven days that are not yet onboarded receive a daily nudge note on their profile, summarising the missing pieces. The nudge runs at 08:00 UTC and stops the moment the customer is marked onboarded — it will never spam a customer that is already complete.
Contact setup guide
Adding Contacts
Contacts are the people inside the businesses you work with. In BeagleCRM, a contact can be linked to a customer, a supplier, both, or neither, so the same person can sit across sales and purchasing without being duplicated unnecessarily.

Add a contact manually
You can add contacts from the global Contacts area, from a customer record, or from a supplier record. When creating the contact, you can optionally link the person to a customer account, a supplier, or both at the same time.
Contact details you can store
Contacts can include salutation, first name, last name, job title, department, primary email, primary phone, mobile phone, and role.
Customer and supplier contact in one record
If one person buys from you and also works for one of your suppliers, keep them as a single contact and link them to both records. This keeps communication history cleaner and avoids managing duplicate versions of the same person.
Filter and open contacts
The global Contacts page lets you search by name, email, or phone, then narrow the list by role and by whether the contact is linked to a customer, supplier, both, or neither. Team members with contact permissions can open a contact for editing; other users are taken to the related customer record when one is linked.
Import contacts in bulk
Use the global Contacts page to download the import template and upload a completed Excel .xlsx file up to 5MB. The import follows an upload, preview, then confirm flow and shows live progress while valid rows are being imported.
Preview and error export
The import preview shows which rows are ready and which rows contain errors before anything is created. If some rows fail validation, use Export errors to download contacts-import-errors.xlsx for review and correction.
Linking after import
The import template does not assign customer or supplier links. After import, open the contact and connect it to the right customer, supplier, or both.
Import template columns
The contact import template includes these headings: Salutation, First Name, Last Name, Job Title, Department, Email, Phone, Mobile, Role, Marketing Email Consent, Marketing SMS Consent, Marketing Post Consent, Marketing Consent Basis, and Marketing Consent Source.
Opt-in cells accept yes / no / true / false / 1 / 0. When any opt-in is true, the Marketing Consent Source column is required — leave it blank and the row is rejected at preview time.
Marketing consent
Each contact carries the same per-channel opt-in (email / SMS / post), lawful basis, and provenance label as customers. See the Customers section for the full breakdown — same fields, same audit-log behaviour, same tokenised unsubscribe handling. Opening a contact in the side panel surfaces the Marketing Consent fieldset; flipping any channel writes an append-only event.
Roles, onboarding, and duplicates
Contact roles matter beyond the address book. A customer needs at least one Decision Maker contact to clear the onboarding checklist, and a lead needs a primary contact before it can be quoted cleanly. Keep one record per person where possible; if the same person belongs to both a customer and supplier, link the single contact to both accounts instead of creating duplicates.
Erase personal data (GDPR)
Admins can honour a right-to-erasure request from the contact or lead detail panel. The Erase (GDPR) button clears the person's name, email, phone, free-text notes, and marketing consent, and marks the record as erased. It is permanent and cannot be undone.
The record itself is kept so that invoices, quotes, and other financial documents referencing it stay intact — you're legally required to retain those under UK GDPR Article 17(3)(b) — but every personal field is wiped. The erasure is recorded in the audit log without storing the deleted values.
Purchasing setup guide
Suppliers
Suppliers are the businesses you buy from. Add suppliers before adding products so each product can be linked to its source. Suppliers also drive the supplier-side of the unified contacts list.
Add one supplier manually
Open Suppliers and use Add supplier. Capture supplier name, address, country, county or region, postcode, email, telephone, mobile, and website. In edit mode, changes save in place while you work, and you can mark a supplier inactive without removing historic records.
Import suppliers in bulk
Download Template, fill the .xlsx, then choose Import. Supplier imports follow the same upload, preview, and confirm flow as the other import tools, with live progress during import.
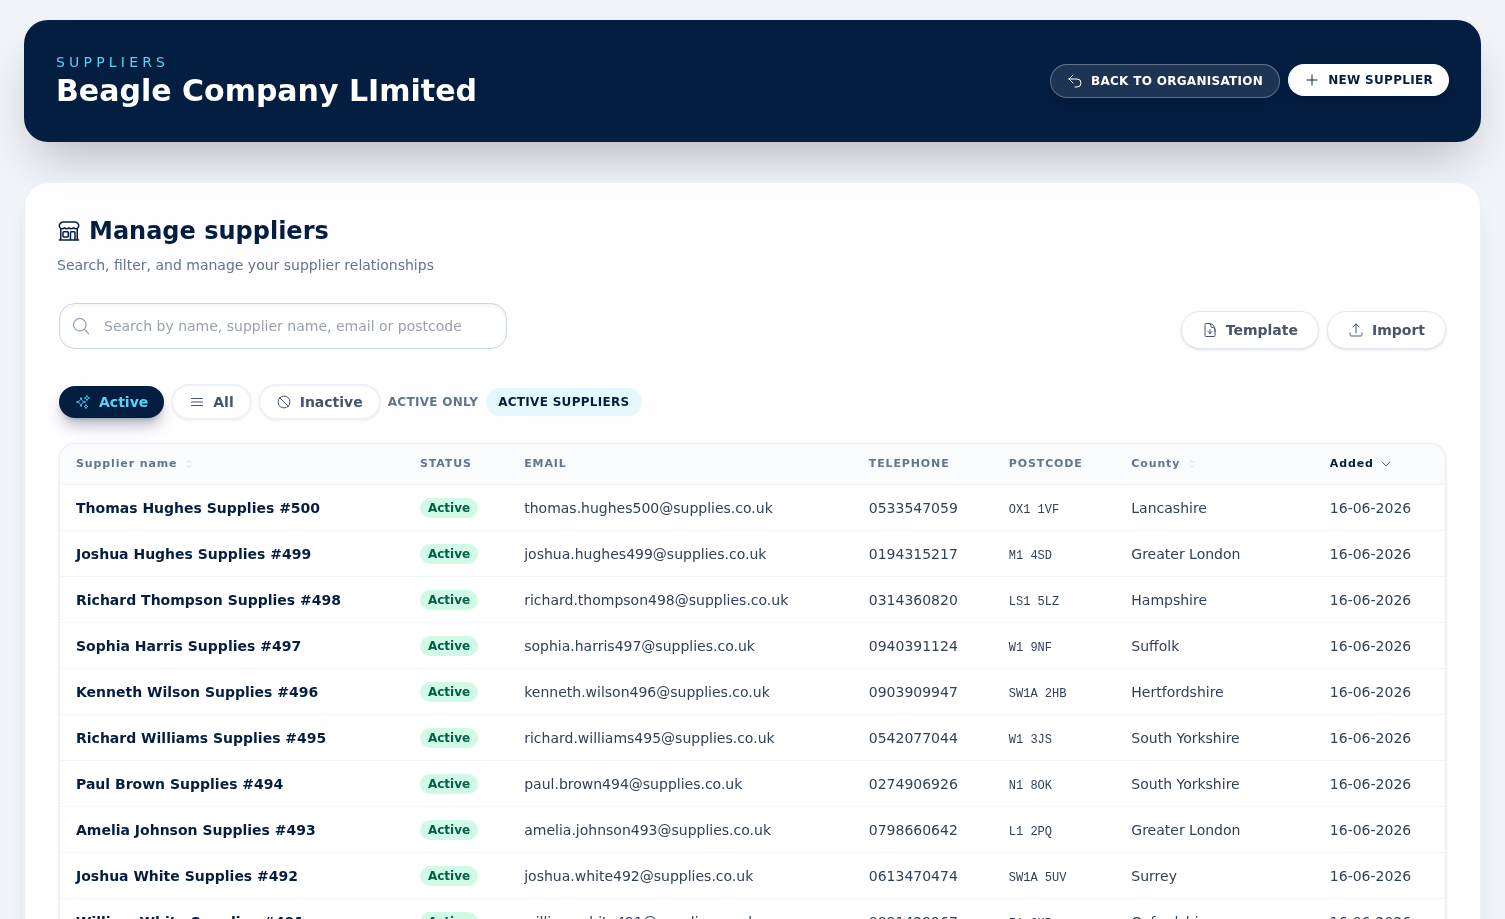
Search and status filters
The supplier list can be searched by name, supplier name, email, or postcode. Filter the grid by Active, All, or Inactive suppliers so paused relationships stay visible without cluttering the main working list.
Import error export
If any supplier rows fail validation in the preview, use Export errors to download suppliers-import-errors.xlsx for correction and re-upload.
Linking contacts and products
From a supplier record, add the people you deal with as contacts and link the products you buy from that supplier. The same contact can sit on a customer and a supplier at the same time.
Deleting suppliers
Use inactive status for suppliers you no longer buy from but still need for historic products, invoices, or audit context. Deletion is protected where related records still depend on the supplier, so inactive is usually the safer operational choice.
Catalogue setup guide
Products & Categories
Products are the items and services you sell. Build your catalogue here so quotations, sales orders and invoices can pull pricing automatically. Use Categories to group products and tidy your catalogue list.
Create a category first
Open Categories and add the high-level groupings you sell. Categories can be created one by one or imported in bulk from an Excel .xlsx file with the same upload, preview, confirm, and error-export flow used elsewhere in BeagleCRM. Imported error rows can be exported as categories-import-errors.xlsx.
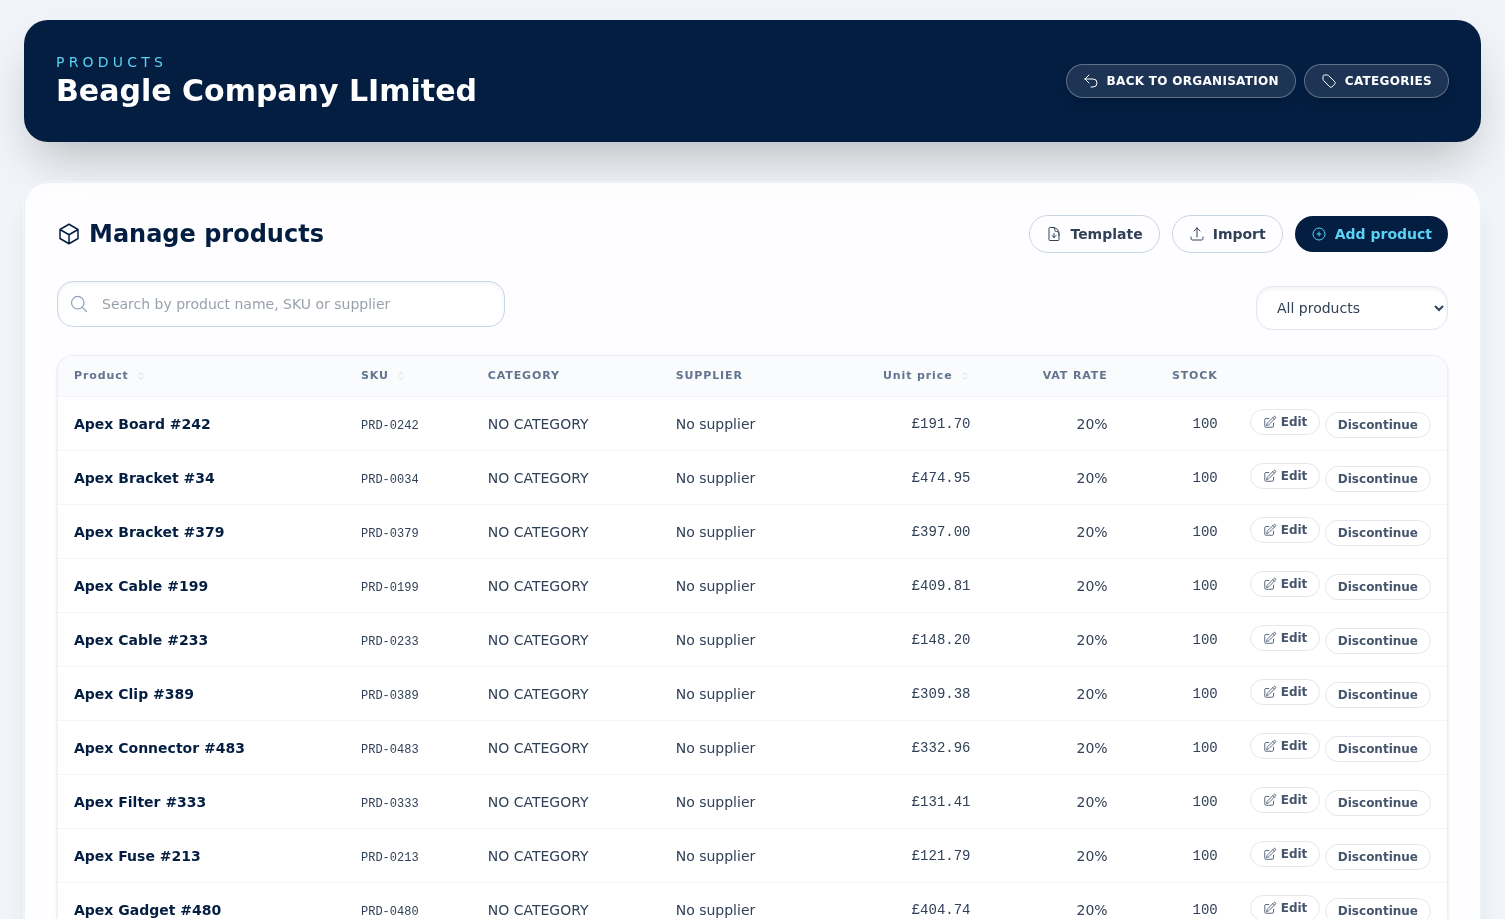
Add products manually
In Products, choose Add product. Capture the product name, SKU, category, supplier, unit price, and VAT rate. If your organisation does not yet collect VAT, products default to 0% VAT until you add the VAT number in Organisation Settings.
Import products in bulk
Use the product import template to bring an existing catalogue across in one upload. Categories must already exist before products that reference them are imported. The product import uses the same upload, preview, and confirm flow, and failed rows can be exported as products-import-errors.xlsx.
Search, categories, and suppliers
The product list can be searched by product name, SKU, or supplier. When adding a product, you can search for an existing supplier and, if needed, jump out to add a new supplier before returning to finish the product. You can also create a new category directly from the category picker in the product form.
Catalogue hygiene before quoting
Product pricing and VAT are copied into quotations, orders, and invoices at the time you add the line item. Updating the product later will not rewrite historic commercial documents. If a product should no longer be sold, remove it from new quotes by deleting or replacing it only after checking whether existing records still need the catalogue item for history.
Procurement & inventory guide
Purchasing & Stock
Purchasing turns BeagleCRM into a light ERP: track stock on the products you buy, record what you spend with each supplier, and raise purchase orders that update stock and bills automatically when goods arrive. Everything here lives behind the Procurement section, so an admin can switch it on or off per team member in Organisation Settings → Team.
Track stock on a product
Open a product and turn on Track stock. Set a reorder level (the point at which the product counts as low) and a cost price — the price you buy at, which is separate from the sell price used on quotes and invoices. Stock-on-hand is never typed in directly: it only ever changes through a recorded stock movement, so every change is auditable.
Adjust stock & see history
Each product has a stock panel showing on-hand, reorder level, and a low-stock badge when it is at or below reorder. Use the adjust form to add or remove stock (a positive quantity adds, a negative removes) with a reason — stocktake, write-off, return, and so on. Every adjustment is listed in the movement history beneath. Negative stock is allowed but flagged.
Record supplier bills
On a supplier profile, the Bills & spend panel lets you record what you are billed. The hero shows spend this year, average bill value, and the date of the last bill, mirroring the figures you already get for customers — but in reverse, for money going out.
Raise & receive purchase orders
From Purchase Orders, choose New purchase order, pick a supplier, and add line items. Each line can be linked to a product so receiving the order updates that product's stock. Quantities are whole numbers; line and order totals are calculated for you. Orders are numbered automatically (PO-0001, PO-0002, …).
Receiving is the moment everything connects
Open a draft or sent purchase order and press Receive & update stock. In a single step BeagleCRM adds each product line's quantity to stock and — unless you untick the box — creates a supplier bill for the order total, linked back to the PO and feeding your supplier spend. A received order cannot be edited or received again, so stock can never be double-counted.
The purchasing dashboard
The top of the Purchase Orders page shows at-a-glance tiles: spend this month and this year, outstanding bills, low-stock items, draft purchase orders, and your total stock valuation (on-hand × cost price). A top-suppliers-by-spend list sits alongside so you can see where your money goes.
Low-stock alerts
Once a day BeagleCRM checks your tracked products. When any fall to or below their reorder level, it leaves a quiet note on the relevant supplier — the one you would reorder from — listing the affected items. No inbox noise; the reminder is waiting where you act on it.
Who can see purchasing
Purchasing is part of the Procurement module. Admins and Agents can raise and receive orders and record bills; Viewers can look but not change. An admin can hide the whole section from a team member by switching off Procurement for them. Organisations that don't buy stock can simply ignore it.
Pipeline guide
Leads
Leads represent active opportunities with an existing customer. Each lead has a status, a source, a primary contact, an estimated value and a next action so you always know what is open, who owns it and what to do next.
Creating a lead
Choose Add lead, pick a customer, set the source and status, and link one or more existing contacts from that customer. If the customer does not exist yet, you can create it inside the lead flow. Mark one linked contact as Primary — that contact becomes the default quotation recipient later.
Next action & follow-ups
Set Next Action Type, Action Due and notes so the lead appears on your tasks/follow-up list. Adding a note can also push the follow-up date forward.
Lead health & risks
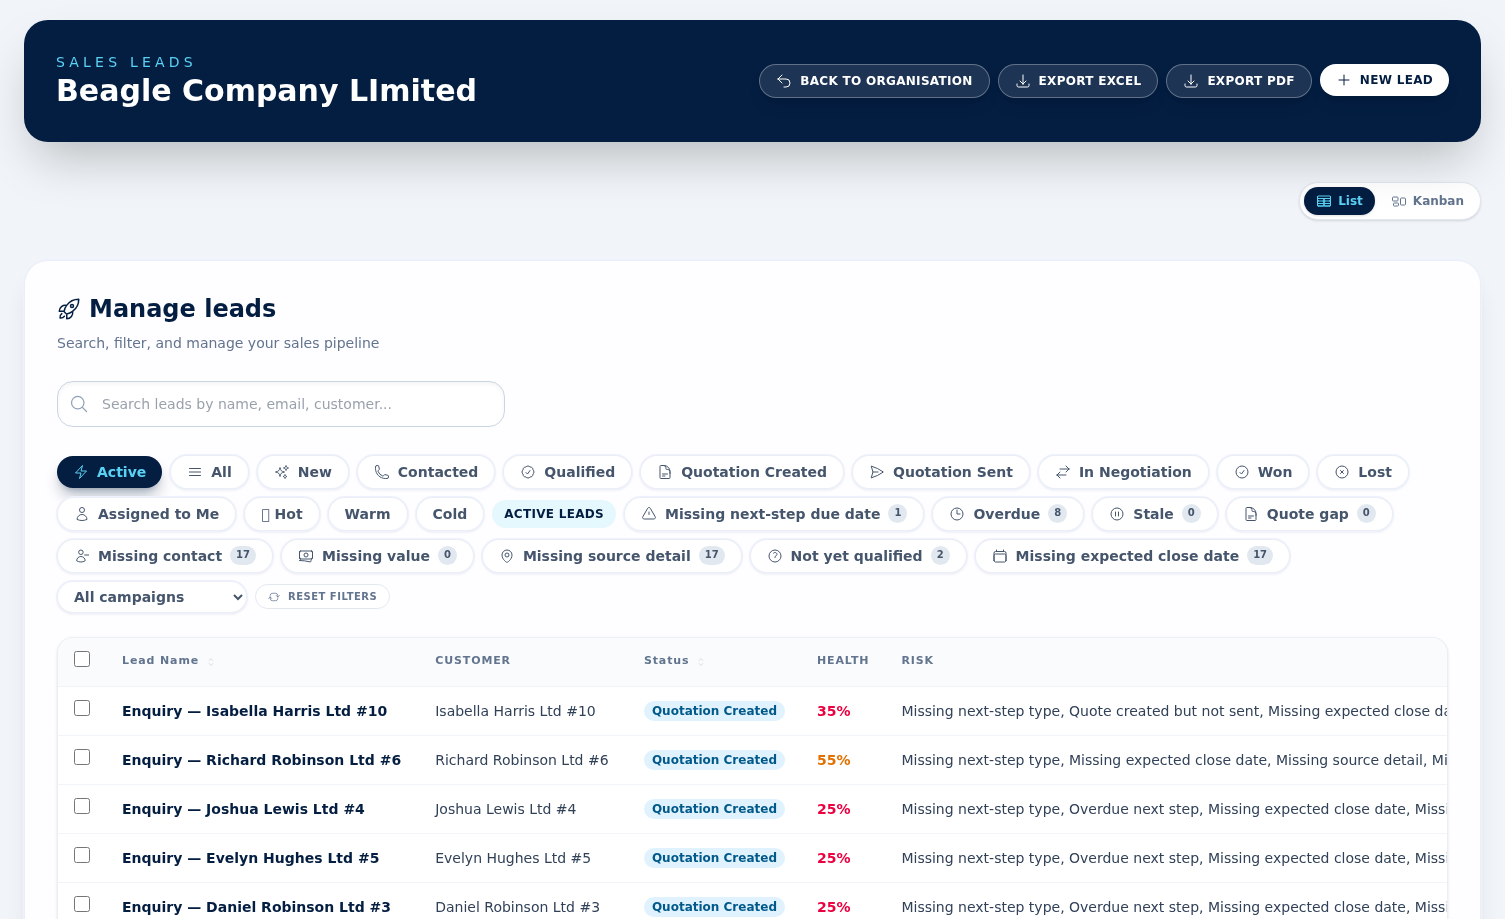
BeagleCRM scores every active lead from 0–100% based on commercial-quality and follow-up risks. The lead detail view shows the score plus the exact gaps to close. The leads grid also gives you quick risk filters with live counts for overdue, stale, missing contact, missing follow-up, and quotation follow-up gaps. See the deep-dive below for the full mechanics, weights and thresholds.
Filters, notes & export
Use the grid to search and filter by status, source, assignee, potential, and risk. Open a lead to add notes, review linked quotations, and export the current lead list to Excel or PDF with the active filters applied.
Closing the lead
Move the lead through your statuses (configured per organisation). Set Won or Lost with a reason; estimated value and stage history are kept for forecast and reporting.
How lead health is calculated
Every active
lead starts at 100%. BeagleCRM checks the lead against a list
of risk flags
— signs the lead is missing critical commercial
detail or is at risk of going cold. Each flag deducts a fixed penalty. The
final score is max(0, 100 − sum of penalties).
Active leads only. Once a lead is marked Won or Lost the scoring stops — the score stays at 100% because the deal is closed and risk flags no longer apply. This is intentional: closed leads should not pollute your pipeline-health KPIs.
Commercial-quality flags
These flag missing data that you need before a lead can realistically progress to quotation. They fire on every active lead until the field is populated.
| Risk | Triggers when… | Penalty |
|---|---|---|
| Not yet qualified | Status is still New or Contacted — the lead has not been moved to Qualified after enough discovery work. | −15 |
| Missing estimated value | No estimated value, or the value is ≤ 0. You need a working figure to forecast. | −15 |
| Missing expected close date | No Expected order date set. Without one the deal cannot land in the right forecast period. | −10 |
| Missing source detail | The free-text Source detail is empty. Helps trace what marketing or referral started the deal. | −10 |
| Missing primary contact | No contact on the lead is marked Primary. Quotations cannot be sent without one. | −10 |
Follow-up & next-action flags
These keep momentum on the deal. They penalise leads that have stopped moving or have no scheduled action.
| Risk | Triggers when… | Penalty |
|---|---|---|
| Overdue next step | Action Due is set but is in the past. The biggest dock — it means the lead is actively neglected. | −30 |
| Missing next-step due date | No Action Due date set at all. The lead has no scheduled next contact. | −25 |
| Missing next-step type | No Next Action Type chosen (call / email / site visit / etc.). The owner has not decided what to do next. | −15 |
| Stale in stage | The lead has sat in its current stage for more than 14 days without progressing. Stage entry timestamp drives this. | −15 |
| Missing follow-up date | No Follow-up date on the lead, so it never appears on the dashboard follow-up list. | −10 |
Quotation-stage flags
Once a quotation is raised against the lead, the lead inherits two extra checks based on the quotation lifecycle.
| Risk | Triggers when… | Penalty |
|---|---|---|
| Quote sent — no follow-up | A quotation has been Sent to the customer but the lead has no scheduled next step. Sent quotes need active chasing. | −25 |
| Quote created — not sent | A quotation exists in Draft but has never been sent. Either send it or discard it. | −20 |
Worked example
A lead in Contacted with a primary contact, an estimated value of £5,000, no expected close date, no next-action type and no next-action due date would score:
100 − 15 (not qualified) − 10 (no expected close) − 25 (no next-step due date) − 15 (no next-step type) = 35%
That score immediately flags the lead in the Poor health filter on the leads grid and the dashboard risk widgets.
Filter thresholds
- Healthy — score ≥ 80%. Nothing to fix.
- Needs attention — score 50–79%. One or two flags — close them quickly.
- Poor health — score < 50%. Multiple risks compounding — either rescue or close the lead.
Where the score appears
- Lead detail page — large indigo health badge with the per-flag risk summary underneath.
- Leads grid — sortable Health column, plus quick-filter buttons for each risk type with live counts.
- Customer detail (Pipeline tab) — the customer-scoped leads grid pushes the same Health and Risk columns.
- Dashboard — risk widgets aggregate the most actionable flags (overdue next step, missing next-step due date, stale in stage, quote follow-up gap) across the whole organisation.
Tips for keeping leads healthy
- Set Next Action Type and Action Due every time you finish work on a lead — the two flags together remove 40 points of penalty.
- Move leads out of New / Contacted as soon as they are real opportunities — the Not yet qualified flag clears immediately.
- Capture an Expected order date even if it is approximate. It feeds forecasting and clears another 10 points.
- Lost leads are not a failure — closing them with a reason removes them from active scoring entirely and keeps your pipeline KPIs clean.
Lead → Quotation flow
Quotations can be raised directly from a lead. The lead’s primary contact becomes the email recipient and the quotation stays linked to the lead so won/lost outcomes update both records.
Bulk actions on leads
Select one or more leads from the list view (checkbox column on the left, or the header checkbox for "select all on this page"). A sticky action bar appears with five options:
- Assign owner — bulk reassignment across reps.
- Change status — move every selected lead to a new pipeline stage.
- Add to campaign — push every selected lead into a campaign as a member.
- Archive — set status to Lost with reason other. Reversible.
- Delete — permanent removal, admin-only. Cascades to lead notes, lead contacts, and quotations per the DB schema.
Batches up to 25 rows run synchronously and refresh the list. Larger batches queue a background job with a progress flash and a final summary. Selection clears on any filter, sort, or page change.
Marketing consent on leads
Same per-channel opt-in, lawful basis, and provenance label as customers and contacts. The lead form renders the Marketing Consent fieldset; flipping any channel writes an append-only audit event. Required for any GDPR-compliant outbound to lead-stage prospects.
See the Customers section for the full audit + tokenised unsubscribe behaviour.
Competitive intelligence
Competitors
The Competitors section gives every competitor a first-class record: a SWOT profile (strengths, weaknesses, opportunities, threats), key contacts, the products you go head-to-head on, and the deals you have faced them in. When you close a deal as Lost, you can record exactly who you lost it to — and that flows straight into win/loss analytics.
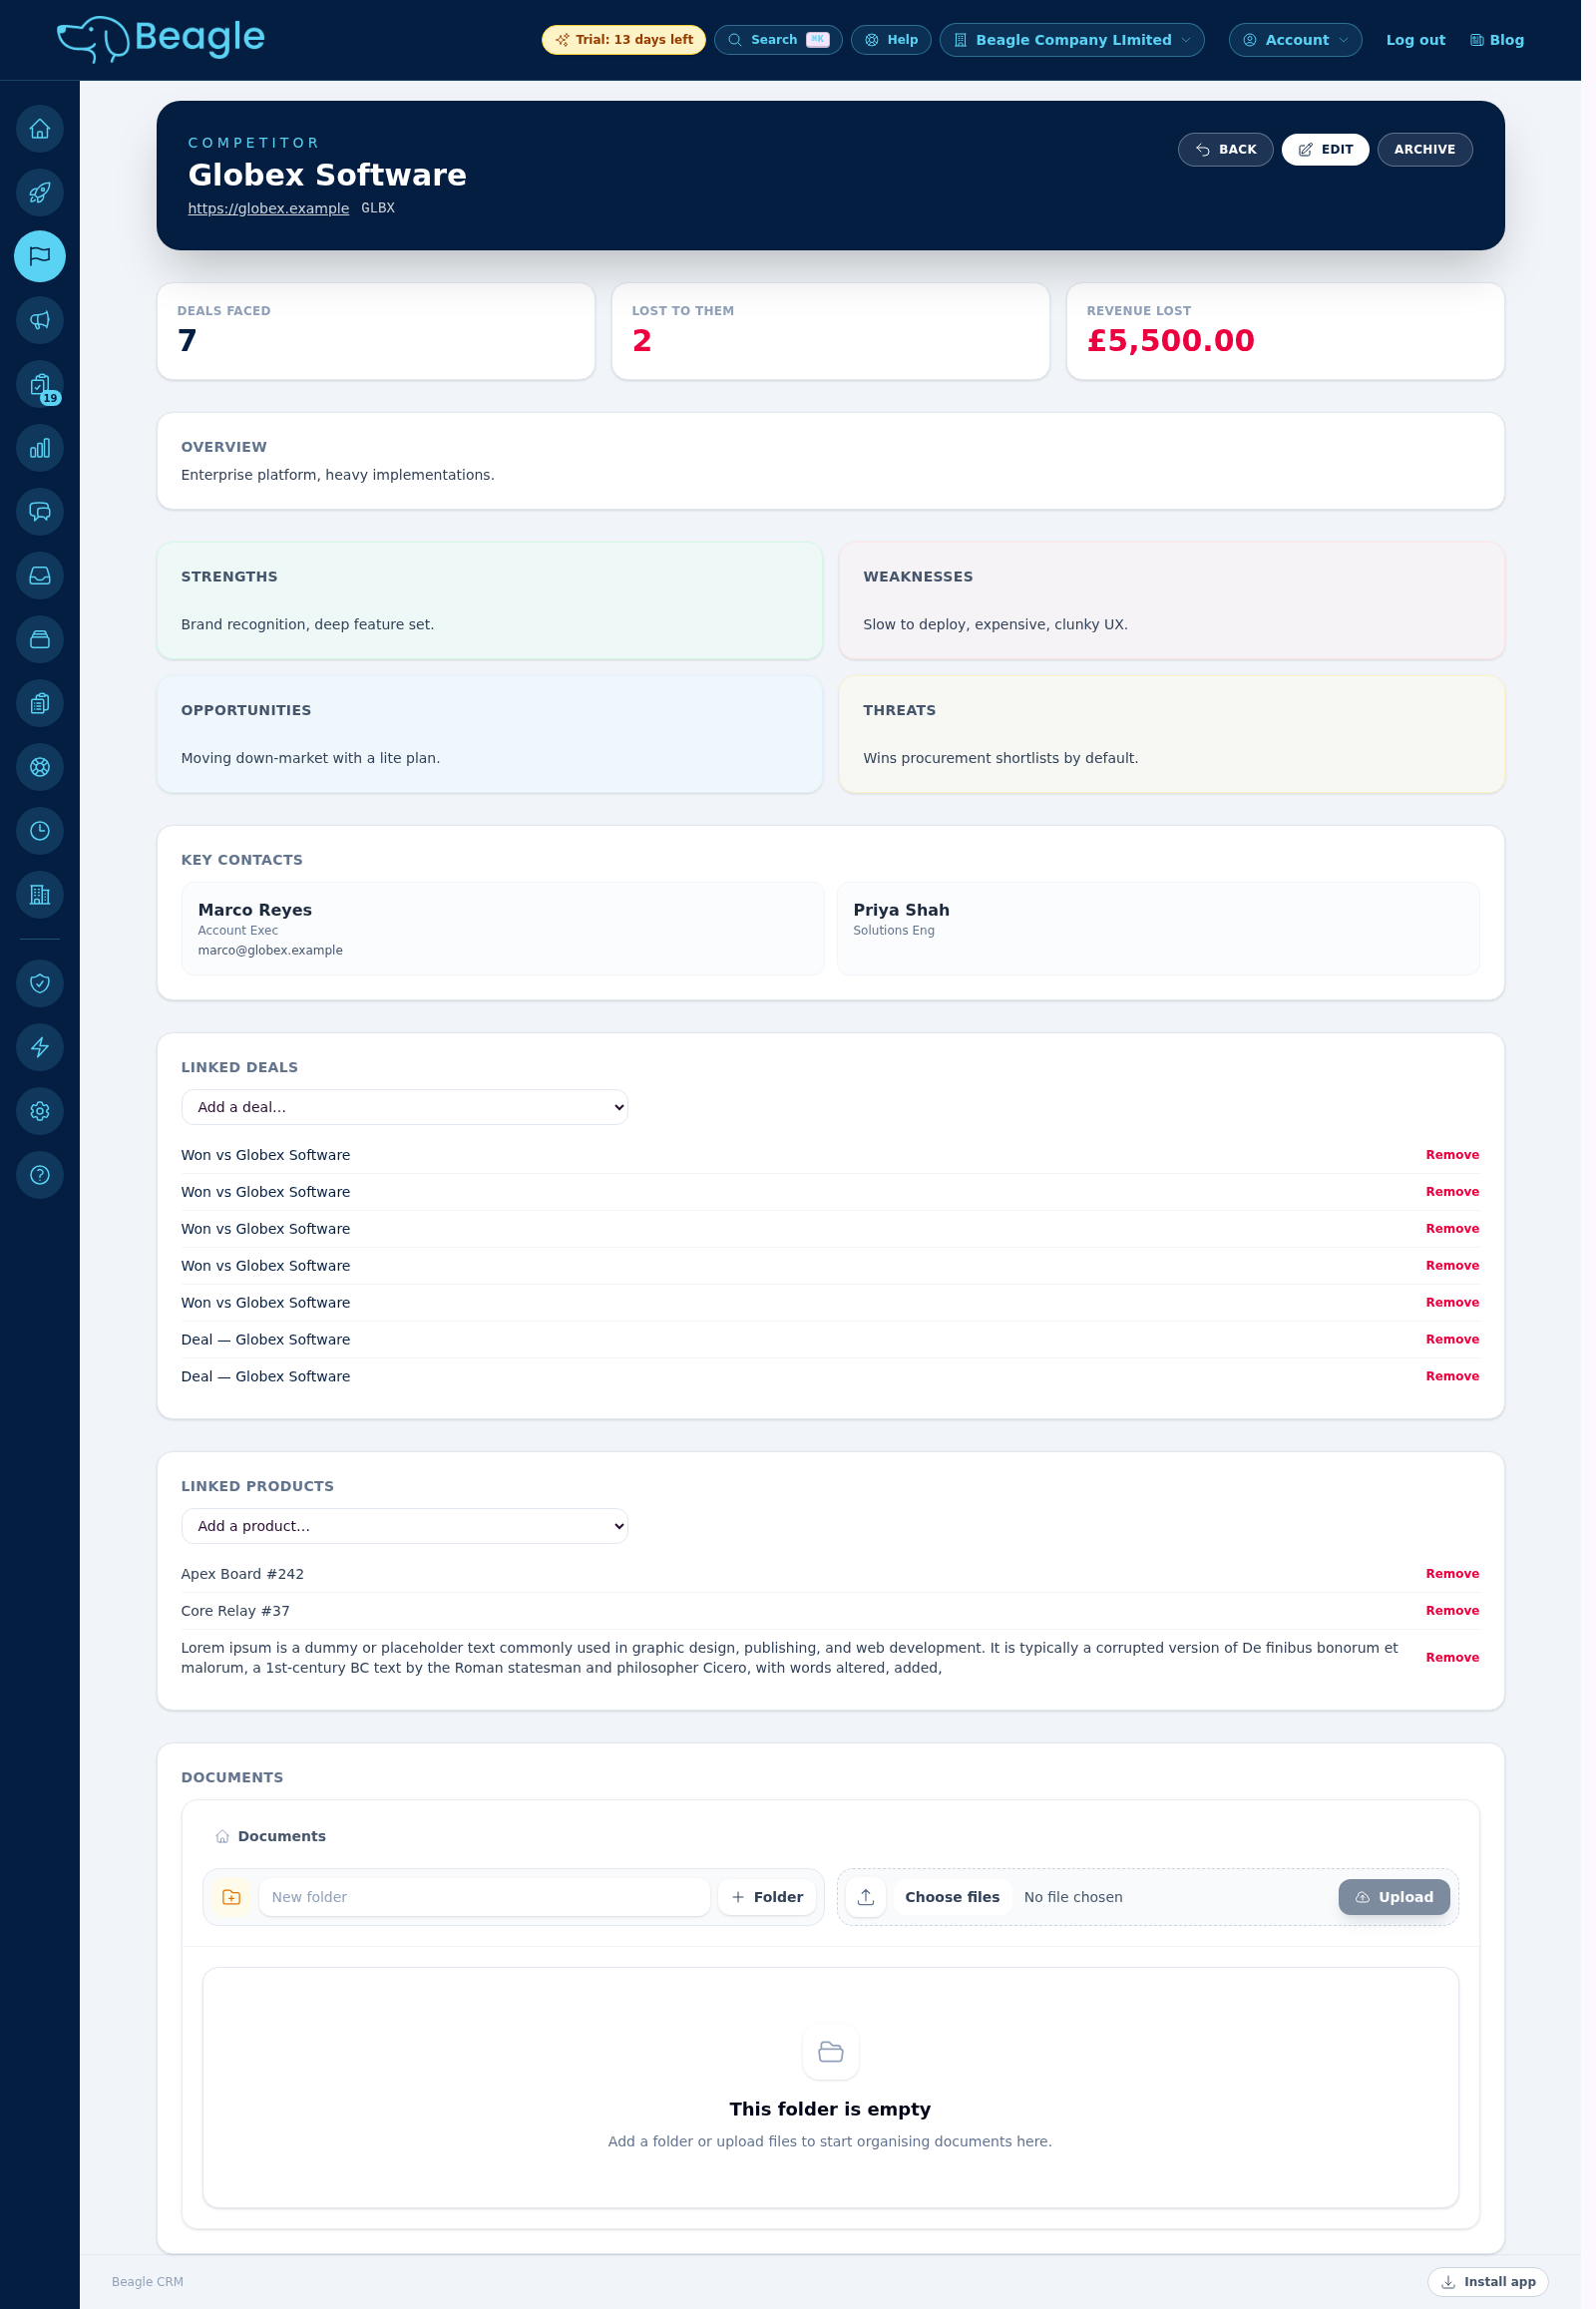
Building a competitor record
Open Competitors from the sidebar or the Sell area of your dashboard and choose New competitor. Capture the name, website and ticker, then fill in the four SWOT panels. Add as many key contacts as you like — each holds a name, title, email and phone. Competitors you no longer track can be archived (kept for history) and reactivated later.
Linking deals & products
On a competitor's page, link the deals you have faced them in and the products you compete on. "Faced" can be many deals per competitor — it forms the denominator of the win rate.
Recording who you lost to
When you mark a lead as Lost, pick the competitor under Lost to competitor. The deal's value becomes "revenue lost" against that competitor. The free-text competitor note still works alongside it.
Win / loss analytics
The Win/Loss analytics dashboard rolls everything up for the whole organisation: total revenue lost, deals lost, your toughest competitor, and a per-competitor breakdown of deals faced, deals lost, revenue lost and win rate.

Tip: Competitors is a switchable section. If a team member can't see it, an admin can enable the Competitors module for them under Team → section access.
Quoting guide
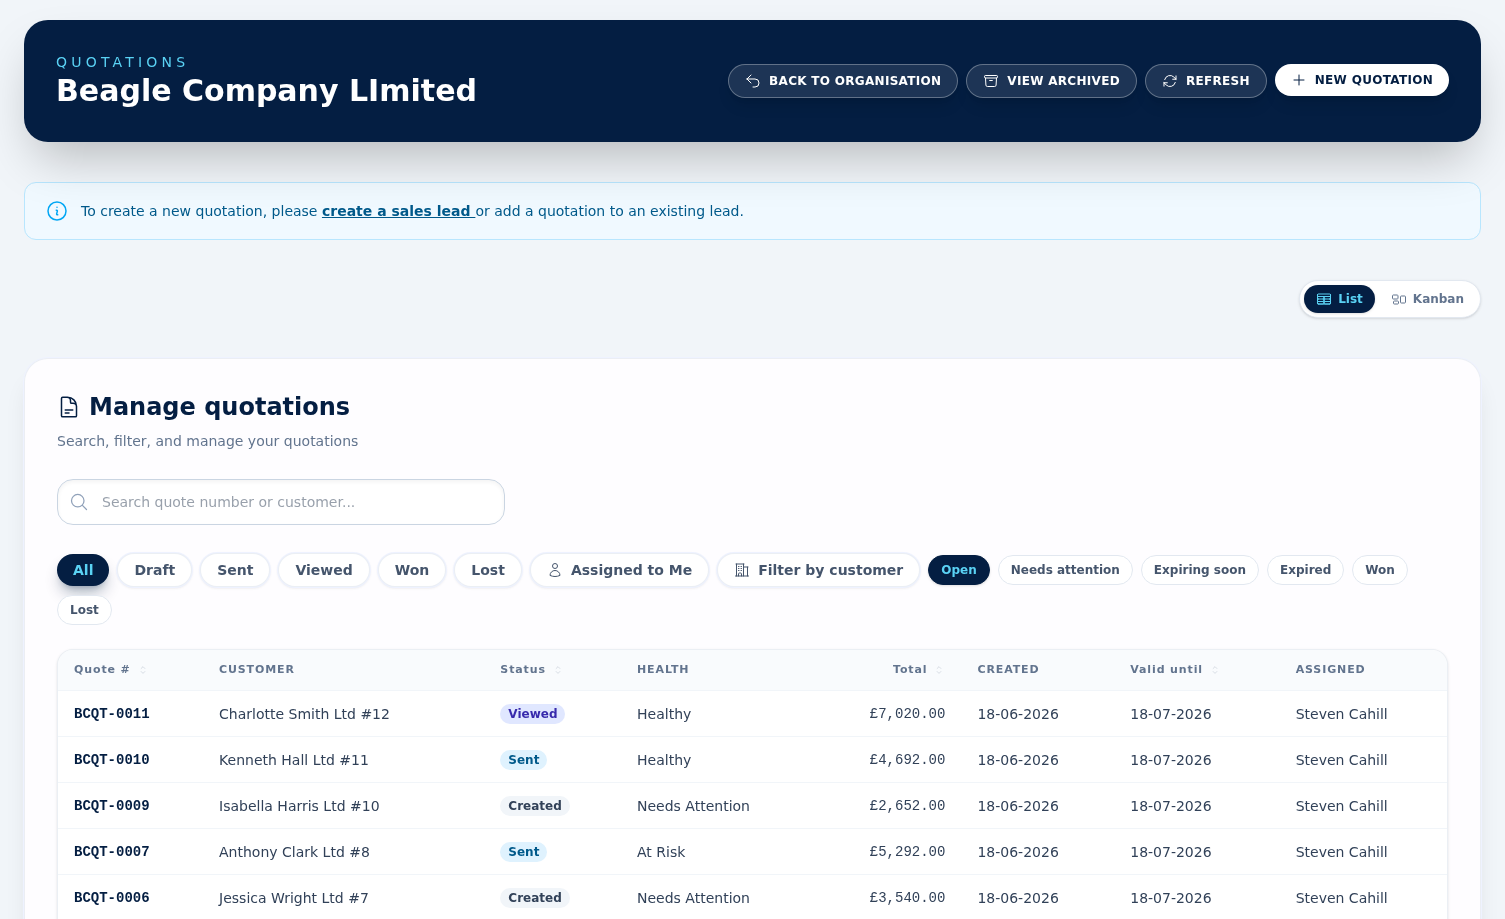
Quotations
Quotations move through four statuses: Draft, Sent, Accepted and Rejected. Each quote belongs to a customer (or lead) and contains product or service line items, automatic VAT and a valid-until date.
Create a quotation
In normal use, quotations are raised from a lead so the customer, lead link, and primary contact are already in place. Set Valid until, then add line items. Search the catalogue to add product items with preset pricing, or add free-text service lines.
Health, expiry & archived quotes
The quotations list lets you search by quote number or customer, filter by status, customer, ownership, and quote health, and separate out expired or expiring-soon work. Admins can also review archived quotations from the archive view.
Send by email or PDF
Send emails the customer with the PDF attached and stamps the quote as sent. Download PDF generates the document without emailing. Re-sending tracks how many times the quote has been sent.
Accept, reject or revise
On a sent quote, mark Accepted to move it forward (you can generate a sales order or invoice from it), or Rejected with a reason. Use Revise quotation to create a new revision while keeping the previous version and sent history.
Editing vs revising a quote
Both buttons live in the Actions panel on a quotation, and they are easy to confuse — but they do different things.
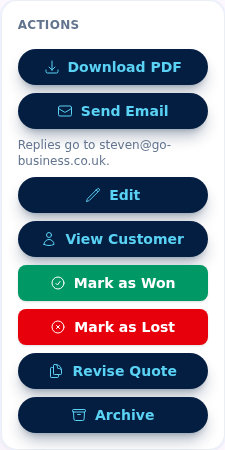
Edit changes the quote in place — same quote number, no new version. It only appears while the quote is a Draft, so it is for fixing a quote before you send it (a typo, a price, a missing line).
Revise Quote creates a brand-new revision — a fresh copy with its own number that supersedes the original, while keeping the previous version and its sent history intact. Once a quote has been Sent, the Edit button disappears and Revise is the right tool, so you never silently change a document the customer has already seen.
Rule of thumb: Draft → Edit. Already sent → Revise.
VAT, numbering & terms
If your organisation has a VAT number, VAT is added automatically. Quote numbers use the prefix and next-number set in Organisation Settings. Your default Terms of sale are appended to every quotation PDF.
Fulfilment guide
Sales Orders
A sales order is the commitment to fulfil. Convert an accepted quotation into a sales order in one click, or create one directly from the Sales Orders screen.
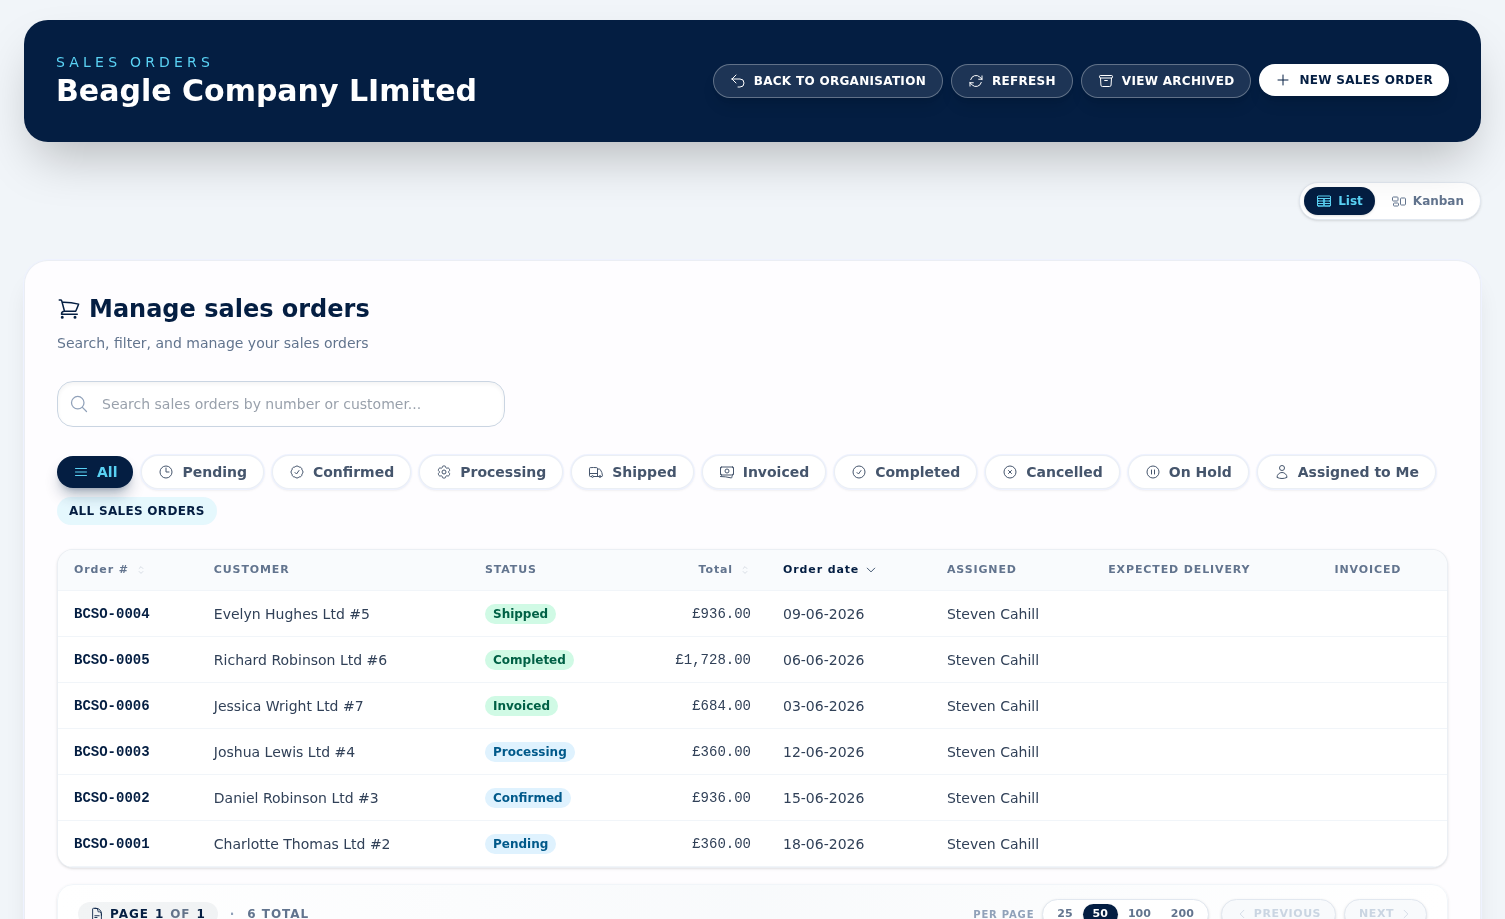
Status flow
The normal forward path is Pending → Confirmed → Processing. Once invoiced, the order moves to Invoiced and can then be marked Completed. Historic records may also show Shipped or On Hold.
Search, filter & archive
The orders list lets you search by order number or customer, filter by status, switch to Assigned to Me, and admins can open the archived sales orders view to restore older records.
Convert to invoice
Use Create invoice from a sales order in Processing to copy line items, customer billing details and pricing into a draft invoice ready to send. The sales order then links back to the created invoice.
PDFs, cancellation & audit trail
Open an order to download its PDF, review the linked quotation and invoices, or cancel it with a reason. Admins can also archive completed or cancelled orders when they no longer need to stay on the main list.
Billing guide
Invoices
Invoices can be raised standalone, from a quotation, or from a sales order. Statuses are Draft, Sent, Partially Paid, Paid, Overdue, Cancelled, Written off and Voided.
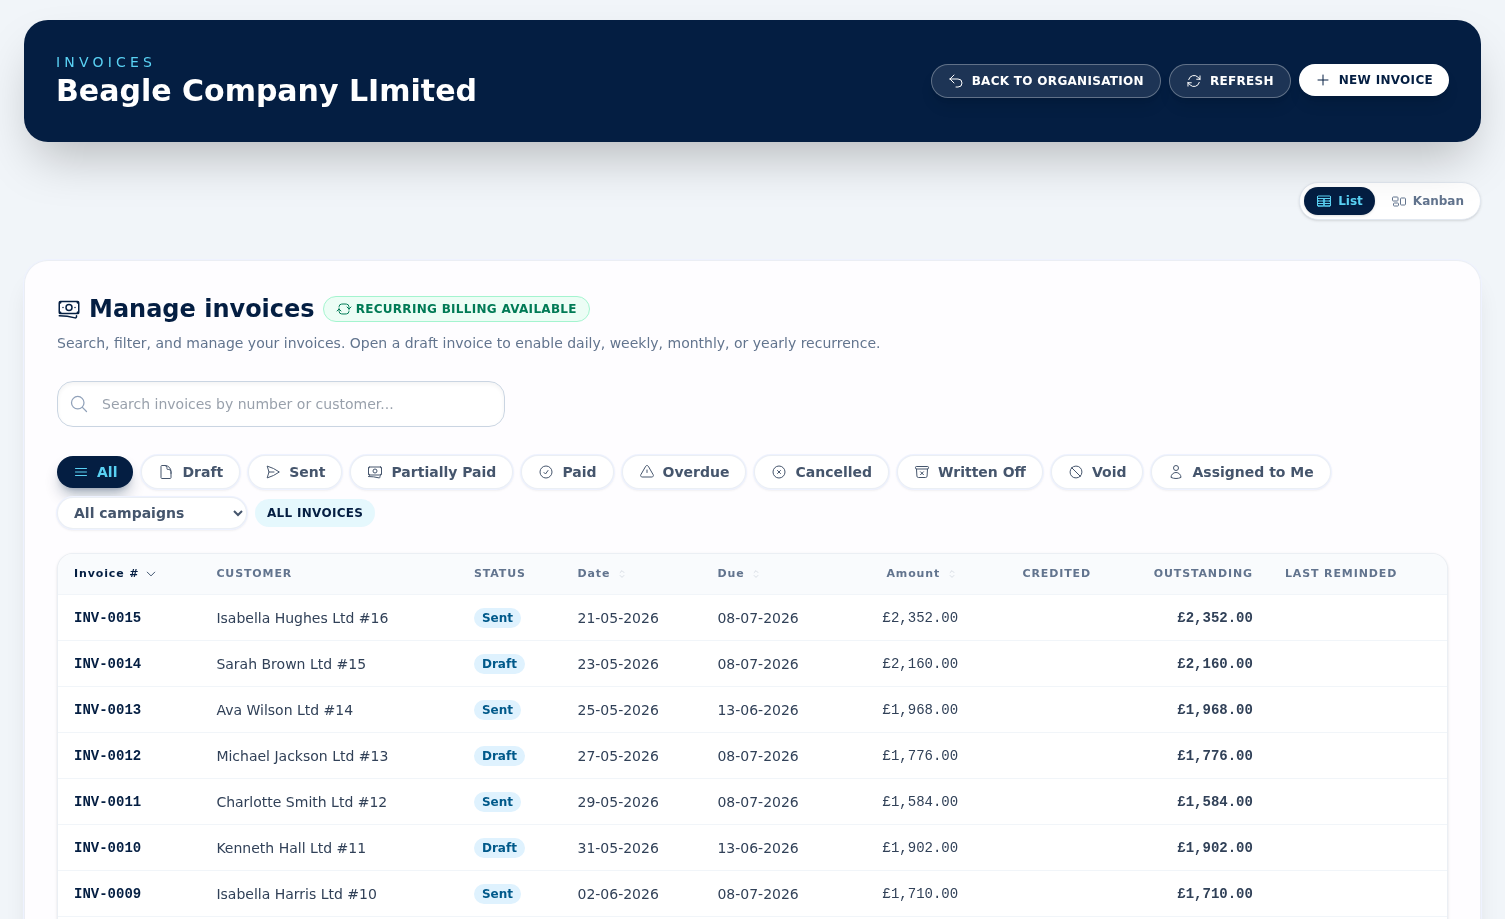
Create a draft invoice
Start from a quotation, a sales order, or a customer. BeagleCRM can carry over the customer, line items, notes, and ownership for you, and draft invoices can use an alternate delivery address when needed.
Sending invoices
You can Mark as sent without emailing, or use Send to email the customer with the PDF attached. The customer must have an email address on file. Reply-to is set to the user sending the invoice; the from-name is your organisation.
Payment terms & due dates
Default payment terms come from Organisation Settings. Once an invoice is past its due date and not paid in full, it flips to Overdue automatically.
Recording payments
Use Mark as paid to record settlement. The invoice keeps paid, credited, and outstanding totals visible on the detail page, so partially paid invoices remain easy to chase.
Recurring invoices
Open a draft invoice to enable recurring billing. You can repeat it daily, weekly, monthly or yearly, set the next run date, optional end date or occurrence limit, and switch on Auto-send for generated invoices.
Reminders
Use Send reminder from the invoice when it is eligible for chasing. The invoice detail page keeps the reminder history, including when it was last reminded and who sent it.
Credit, void and recovery actions
You can create a credit note from the invoice, apply available account credit to reduce the outstanding balance, or Void a sent invoice with a reason. The invoices list also shows credited amounts and the last reminder date.
Exporting your invoices
You own your billing data and can take it out of BeagleCRM at any time — for your accountant, your bookkeeping software, or your own records. There are three ways to export, depending on whether you want one invoice or many.
A single invoice as a PDF
Open any invoice and choose Download PDF. You get a print-ready
copy (Invoice-<number>.pdf) — the same document your customer
receives when you email it.
Many invoices as a spreadsheet (CSV)
Use this for accounting or analysis. It is one row per invoice, ready to open in Excel, Google Sheets, or import into your bookkeeping tool.
- Go to Reports and open the Invoices report.
- Set the filters (date range, status, and a Gross or Net tax basis) so the report shows exactly the invoices you want.
- Click CSV. The file downloads straight away, matching your filters.
Many invoices as PDFs (ZIP)
When you need the actual PDF documents in bulk — for an audit or year-end — export a ZIP of every matching invoice.
- On the same Invoices report, filter to the invoices you want.
- Click ZIP export. Larger exports are prepared in the background, so you can keep working — no need to wait on the page.
- When it is ready, a green Invoice export ready banner appears at the top of Reports with the invoice count. Click Download ZIP.
A prepared ZIP download stays available for 7 days, then expires — just run the export again if you need it after that.
Refunds & credits
Credit Notes
Raise a credit note from an invoice when you need to reduce what is owed, return money, or store value on the customer account. Credit notes move through Draft, Issued, and Voided.
Choose the credit mode
You can create a Full Credit, credit selected invoice lines, or enter a Custom Amount with its VAT rate. BeagleCRM shows the maximum creditable balance before you confirm.
Paid vs unpaid invoices
For unpaid invoices, the credit normally applies back to the invoice balance. For paid invoices, you choose whether the issued credit becomes Account Credit or a Refund.
Refund details & account credit
Refund credits can store a refund method, reference number, and refund date. Account-credit resolutions increase the customer's available balance so it can be applied to a future invoice.
Numbering, history & voiding
Credit notes have their own prefix and next number in Organisation Settings. The credit notes list links each note back to its invoice, and an Issued credit note can be voided with a reason to restore the invoice balance.
Membership guide
Team
The Team area shows everyone with access to the current organisation. Each workspace has its own member list, pending invitations, and role assignments.
Inviting members
Admins can open Invite member, enter an email address, choose a role, and send a secure registration link. If the person is already in the app, they can be added straight to the organisation.
Roles and controls
The team list shows who is an Admin, Manager, or Member, plus pending invitations awaiting acceptance. Admins can change roles and remove members, with extra protection around the original founder account and last-admin scenarios.
Section access (per member)
Roles control what a member can do; section access controls which areas they can see at all. Each member has a row of toggles for the departmental sections — Invoicing, Projects, Reports, Leads, Campaigns, Tasks and Customers. Every section is on by default; un-tick one to hide it for that person. A switched-off section disappears from their sidebar, its pages redirect away if reached by direct link, and its tiles drop off the dashboard and reports — so, for example, you can make invoicing genuinely unreachable for a specific member.

The founder is protected
The original founder account has no section toggles — no admin (or anyone) can restrict the founder's access. Team and Settings are never toggleable either, so nobody can lock themselves or each other out of member management.
Set it before they join
You can also choose section access on the Invite member form, so a new member lands with the right areas already hidden the moment they accept — no need to adjust the toggles afterwards.
Internal communication
Chat
Chat is organisation-scoped, so every workspace has its own conversation list, member presence, and message history. Use it for internal team communication without leaving the CRM.
Conversation types
Start direct messages, create channels, or open group conversations with members from the same organisation. Your first available conversation opens automatically when you land in Chat.
Working inside chat
Chat supports live unread counts, online presence, replies, pinned messages, member management, and file uploads. If you need a separate communication space for a practice team, use Chat inside that second organisation rather than your live one.
Personal & team work
Tasks
Tasks track follow-ups across leads, customers, quotations and invoices. Statuses are Backlog, To do, In progress, On hold, Recurring, and Done. Mark a task as priority to push it to the top of your list.
Where tasks come from
Create tasks manually, or BeagleCRM creates them from lead next-action dates and overdue invoices via automations. Tasks can also belong to customers, projects, and project phases, so the same work item appears in the right operational context.
Recurring tasks
A task with the Recurring status repeats on a schedule so housekeeping work (weekly check-ins, end-of-month review) stays on the list.
Board, calendar, and list views
The Tasks page has three working modes. Board groups tasks by status and supports quick filtering by search, assignee, and due window. Calendar shows due work by month, week, or day, including timed tasks. List gives a compact table for scanning, sorting, and opening tasks quickly.
Inside a task
The task form separates essentials from schedule and context. Use it to set owner, assignee, customer, project, project phase, start date, due date, due time, reminder, repeat pattern, and whether weekends are allowed. After saving, add notes and one or more checklists; checklist items can be ticked off and reordered.
Manual only vs. all tasks
Automation-generated tasks (onboarding checklists, lead follow-ups, overdue invoice chases) can swamp the board, calendar and list when you have hundreds of customers. The Tasks page has a Manual only / All tasks toggle next to the filter button. Manual only is the default — automation-managed tasks are hidden across board, calendar and list views. Click the button to flip to All tasks and see everything, including automation output.
You can still see every onboarding task for a single customer on that customer's Success plan and Onboarding panels.
Delivery workspace
Projects
Projects are the delivery workspace for everything that happens after a sales order is accepted. Each project is owned by an organisation and a customer, has a target date, a manager, an optional team of members, and a stack of phases that organise the work. Projects can be created manually or from a project template so repeated delivery plans start with the same phases and starter tasks. The project page is a tabbed shell with Overview, Phases, Tasks, Gantt, Files, Notes, Team and Activity tabs — switch tabs to drill into a specific aspect; everything stays in the same project context.
Overview tab
Snapshot of the project: customer, manager, target date, progress, the health badge, the Needs attention panel (see below), recent activity, phase progress and the customer-portal preview. Use this tab for a one-glance status check.
Phases tab
Add, reorder, complete, block or delete phases. Phases are the organising spine of the project — they group tasks, docs and time entries so a progress bar can be computed per phase. A phase can be blocked with a reason; blocked phases roll up into the Overview attention panel.
Tasks tab
Lists tasks attached to this project. Each row shows: select checkbox, pin (priority) star, task name (links to the edit form), the assignee email (or Unassigned if no owner), the phase pill (or Unassigned if no phase), and the status. Use the phase filter pills above the list to scope to a single phase or to unassigned-phase work — the list reloads as you click. Select multiple rows to move them to another project.
The New task button inherits the active phase filter, so filtering by a phase first pre-fills the phase on the new task. Inside the form you can also pick the phase from a dropdown (No phase = leave unassigned).
Each task can be linked to a customer (shown in the form's Context section). For a project task this is inherited from the project and locked — it renders as a green "Linking to: {customer}" badge you cannot change. Standalone and lead tasks instead expose an editable "Search customers…" picker so you can attach (or clear) the customer yourself.
Gantt, Files, Notes
Gantt renders tasks on a timeline keyed off start/due dates; drag a bar to update both. Files attaches folders, documents and uploads per phase (or unassigned). Notes is a chronological log of free-text updates, with mentions to notify team members.
Document export
Open any project document from the Files tab and download it as PDF, Word (.docx) or Markdown (.md) using the buttons in the document header. PDF keeps the branded layout; Word and Markdown convert the document body for editing or reuse elsewhere.
Team tab
Invite team members and set their role: Owner (full control), Manager (edit project + tasks), or member (view + comment). The last owner cannot be demoted or removed. Use this tab to also generate a customer portal invite token so the customer can view their portal page.
Visibility — public or restricted
Every project is either Public (visible to all team members with Projects access) or Restricted (visible only to listed members, plus admins and the project owner). Set this from the Visibility field when you create or edit a project — only admins and managers can change it.
A restricted project is fully hidden from anyone who is not on its list: it does not appear in the projects list, dashboards or customer links, and it cannot be opened, exported to PDF or have its documents downloaded. Add the people who should see it from the Team tab; admins, the owner and the person who created the project always keep access. Restricted projects show an amber Restricted lock badge on their card and header.
Activity tab
Append-only audit log of every change to the project, phases, tasks, docs and members. Filter to internal-only or include portal events.
Needs attention — how it works
The Overview tab has two separate signals that both use the words "needs attention" — they are computed independently and you can see one without the other:
-
Project health badge
(top of the overview header). Three states:
- On track — no contributing signals.
- Needs attention — at least one of: a phase or task is blocked, the project itself is blocked, the target date is within the next 7 days, or no activity has been recorded for more than 14 days.
- At risk — an overdue task exists, or the target date has already passed.
Hover the badge to see the list of reasons that contributed. The badge is computed live from current state — there is no manual override; clear the underlying reason (unblock the phase, push out the target date, log activity) and the badge updates.
-
Needs attention panel
(further down the overview, above blockers). Has three sections:
- Overdue tasks — up to 5 open tasks whose due date is before today, sorted by oldest first.
- Upcoming (next 7 days) — up to 5 open tasks due today or within the next week.
- Blockers — the project itself if it is blocked, plus any blocked phases and blocked tasks.
The panel header itself flips between two titles to avoid false alarms:
- "Needs attention" (amber warning icon) — shown when there is at least one overdue task or at least one active blocker.
- "Tasks & blockers" (calendar icon) — shown when only upcoming tasks are populated (no overdue, no blockers). This is informational only, not a warning.
Important: the badge and the panel share some inputs but not all. A project can show "Needs attention" on the badge because the target date is within 7 days, while the panel shows "Tasks & blockers" because there are no overdue tasks and no blockers. That is by design: the badge is a forward-looking health indicator; the panel summarises actionable items right now.
Project templates and time tracking
Project templates
Admins and managers can open Project templates to create reusable phase and task structures. A template can include phased tasks, unassigned starter tasks, target offsets, due offsets, and default assignee roles. Templates can be archived and restored without affecting projects already created from them.
Project time
The project time page lists logged entries newest first and shows per-user totals. Log a date, duration, note, optional task, optional phase, and whether the time is billable. Members log their own time; managers can record time for another organisation member. Billable time is tracked for reporting only and does not generate an invoice automatically.
Inviting a customer to the portal
The customer portal lets a customer's contact sign in to a secure page and follow their project. Granting access is a two-step gate — both steps must be on before the invite form will offer any contacts:
- Enable the portal for the organisation (once). Go to Organisation Settings and switch Customer Portal on. This is an organisation-wide toggle and only needs setting once; an admin or manager can do it. Until it is on, invites are rejected with "Customer portal is not enabled for this organisation."
- Enable customer access on the project. On the project, turn on customer access. This reveals the Invite portal contact form on the project page.
- Choose a contact and send the invite. The contact dropdown lists the linked customer's contacts — so the project must have a customer, and that customer must have at least one contact. Pick a contact, click Invite, then copy the one-time link (shown only once) and send it to them. Active invites are listed below the form and can be revoked at any time.
If the contact dropdown is empty, check that the project has a customer and that the customer has contacts — add them under Customers → the customer → Contacts.
What customers can do in the portal
Beyond viewing their project, an invited contact can now act on it. Every action re-checks their invite, so a revoked or read-only preview link can only look, never change anything:
- Two-way messages. A customer comment notifies the project owner and members (in-app and by email). When you save a project note marked Visible to customer portal, the customer is emailed an update with a link back to their portal.
- File uploads. Customers can share files, which land in a Customer uploads folder on the project (attributed to the contact) and notify the team.
- Approvals. Use the Customer approvals card on the project overview to request a decision. The customer approves or requests changes in the portal, optionally with a note; you are notified and the outcome is recorded.
- Task interaction. On customer-visible tasks, the customer can tick them done (or reopen) and leave per-task comments. The team is notified of each.
All of these surface in the project's Activity and the staff notification bell. Staff-facing emails stay plain; customer-facing emails carry your organisation's portal branding.
Customer view — choosing what the customer sees
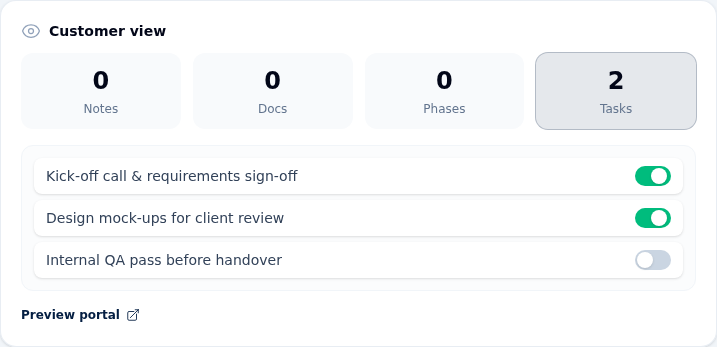
Linking a task (or note, doc or phase) to a customer is not what puts it on the portal — visibility is a separate, deliberate toggle. You control exactly what the invited contact sees from the Customer view panel (eye icon) on the project's Overview tab.
The panel shows four count tiles — Notes, Docs, Phases and Tasks — each counting the items currently visible to the customer. Click a tile to expand it and flip each row between Visible and Hidden. The Preview portal link opens the customer's actual portal view so you can check the result. This panel is manager+ only.
Ordering the projects list
The projects list opens in Manual order — a custom arrangement you set by dragging, shared across everyone in the organisation. Pick a different option from the Sort dropdown (Name, Target date, Status, and so on) any time; choose Manual order again to return to your saved arrangement.
To rearrange, hover a card and grab the grip handle (the icon centred on its top edge), then drag it into place. The new order saves immediately and updates live for anyone else viewing the list. Reordering is available to managers and admins; viewers see the same order but cannot change it.
Dragging is only enabled in Manual order with no search term or column sort active — that way you are always reordering the full list rather than a filtered slice. Switch to a column sort or type a search and the cards become read-only until you clear it.
Recent project workflow improvements
- Drag-and-drop project ordering — the projects list now opens in a shared Manual order you set by dragging cards with the grip handle. See the Ordering the projects list explainer above.
- Choose what the customer sees — the Customer view panel on the Overview tab now lets managers flip individual notes, docs, phases and tasks Visible/Hidden on the portal, with a Preview portal link. See the explainer above.
- Export documents to Word & Markdown — project documents can now be downloaded as Word (.docx) or Markdown (.md) alongside the existing PDF export, from the buttons in the document header.
- Assignee column on the project tasks tab — previously the row showed only the phase pill, which made an un-phased task look "unassigned" even when it had an owner. Each row now shows the assignee email between the task name and the phase pill, with "Unassigned" only when no owner is set.
- Phase selector inside the task form — when a task belongs to a project with phases, the form now exposes a Phase dropdown (with a No phase option) instead of a hidden field. You no longer have to filter by phase on the project page to inherit it.
- Phase filter pills reload the task list — clicking a phase pill on the Tasks tab now reloads the list immediately. Previously the URL updated but the list stayed stale until you refreshed.
- Attention panel header is now context-aware — the panel no longer shouts "Needs attention" when the only content is upcoming tasks. See the panel explainer above.
Workflow controls
Automations
Automations let admins and managers tune the built-in workflow rules that create follow-up actions around leads, quotations, overdue invoices, and new customers.
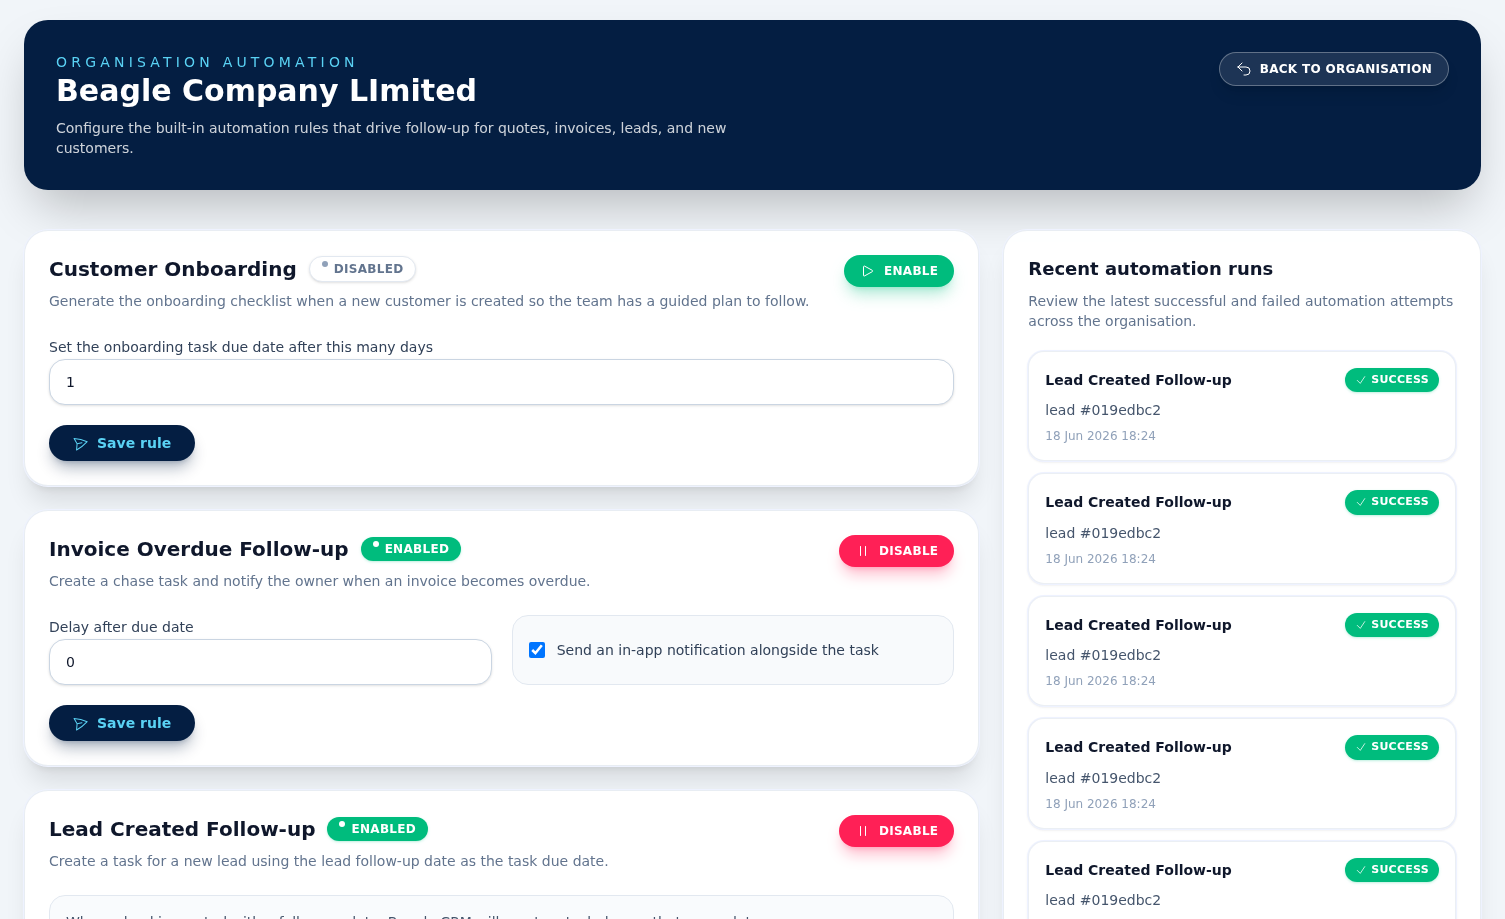
Built-in rules
Open Automations from organisation settings to enable or disable the standard rule templates and edit settings such as delay days, stale-day thresholds, and notification behaviour.
Recent automation runs
The sidebar shows recent successful and failed automation runs so you can confirm that rules are firing against the right records and spot problems quickly.
What each built-in rule does
- Lead Created Follow-up creates a task for a new lead using the lead follow-up date as the task due date.
- Quote Sent Follow-up creates a follow-up task after a quotation is sent. The default delay is 3 days.
- Invoice Overdue Follow-up creates a chase task and can notify the owner when an invoice becomes overdue.
- Lead Stale Follow-up creates a reminder task when an active lead has not moved for the configured stale threshold. The default threshold is 14 days.
- Customer Onboarding generates onboarding checklist tasks from the organisation's default onboarding template when a new customer is created. This rule is disabled by default so new workspaces can decide when to turn it on.
Customer support
Service Desk
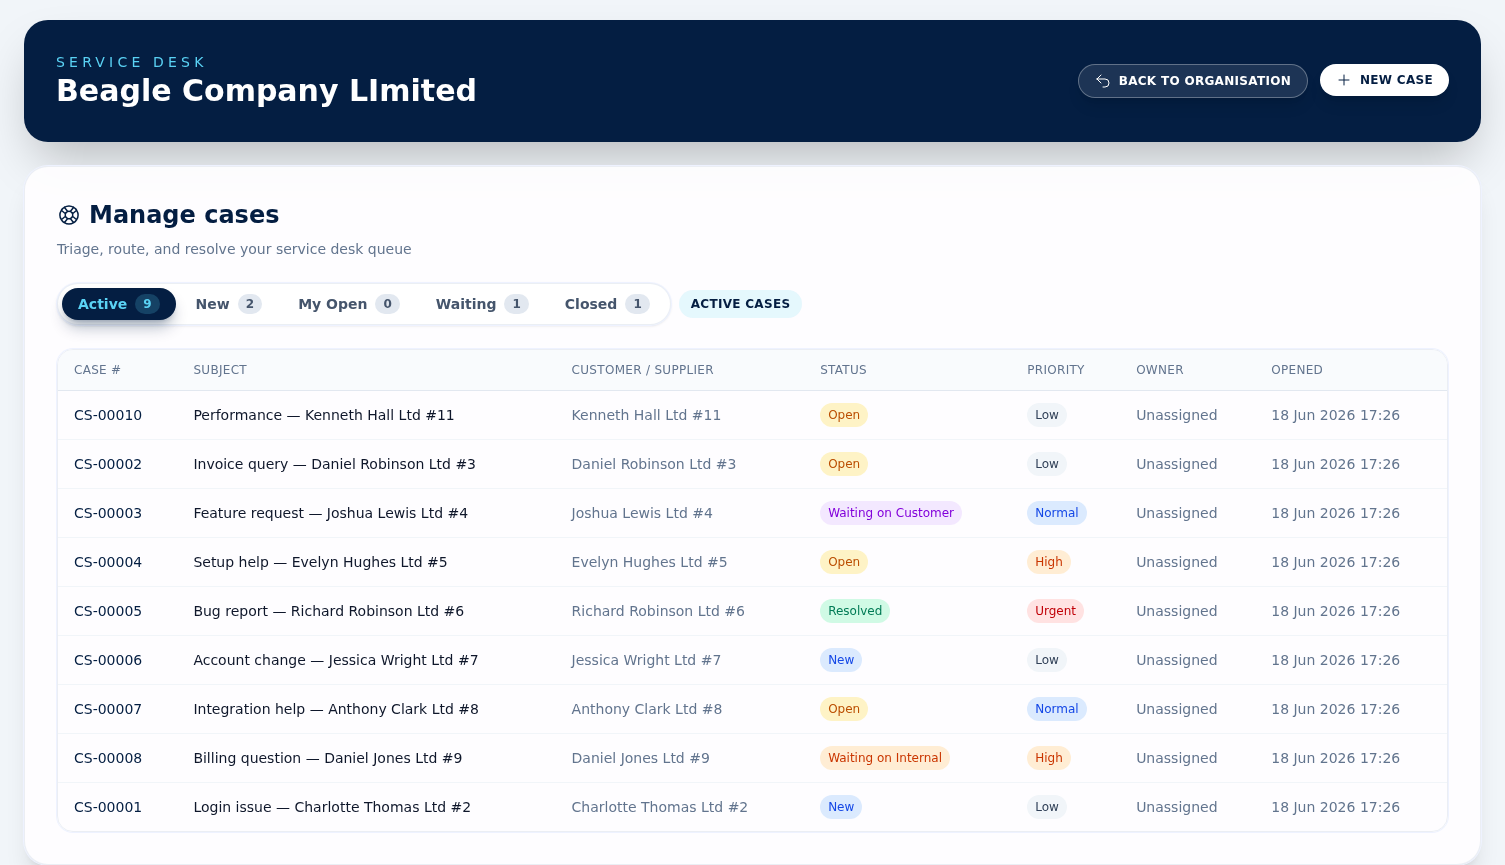
Service Desk tracks support work as cases. Cases can be created from your support inbox or logged manually by your team. Statuses are New, Open, Waiting on customer, Waiting on internal, Resolved and Closed. Each case also has a category, priority, owner, and one linked customer or supplier.
Inbound email → case
Configure your support inbox in Organisation Settings. Emails received there can create support cases, with the original subject, message body, sender, channel, originating email, and inbox account saved onto the case.
Log a case manually
Use New Case in Service Desk when the issue starts by phone, chat, or an internal handover. Set the subject, category, priority, summary, owner, and then link the case to either a customer or a supplier.
Queues and ownership
The main case list includes preset queues for Active, New, My Open, Waiting and Closed. Assign an owner when somebody is responsible for the next step, or leave the case unassigned until it is picked up.
Notes and customer replies
In the case workspace, add notes as either Internal or Customer. Customer-visible notes are emailed out, and replies to those emails can be added back onto the same open case automatically.
Case detail workspace
Open a case to edit the subject, category, priority, status, owner, and account links. A case can link to one customer or one supplier, not both. The workspace shows summary, details, linked account, opened/resolved/closed dates, notes, and related projects where available.
Priorities and categories
Priorities are Low, Normal, High, and Urgent. Categories include general query, complaint, billing query, delivery issue, product issue, order change, return or refund, appointment change, account query, and feedback.
Resolve before closing
Cases move through active statuses first. When the issue is complete, resolve the case with a resolution summary, then close it once no further work is needed.
Email integration
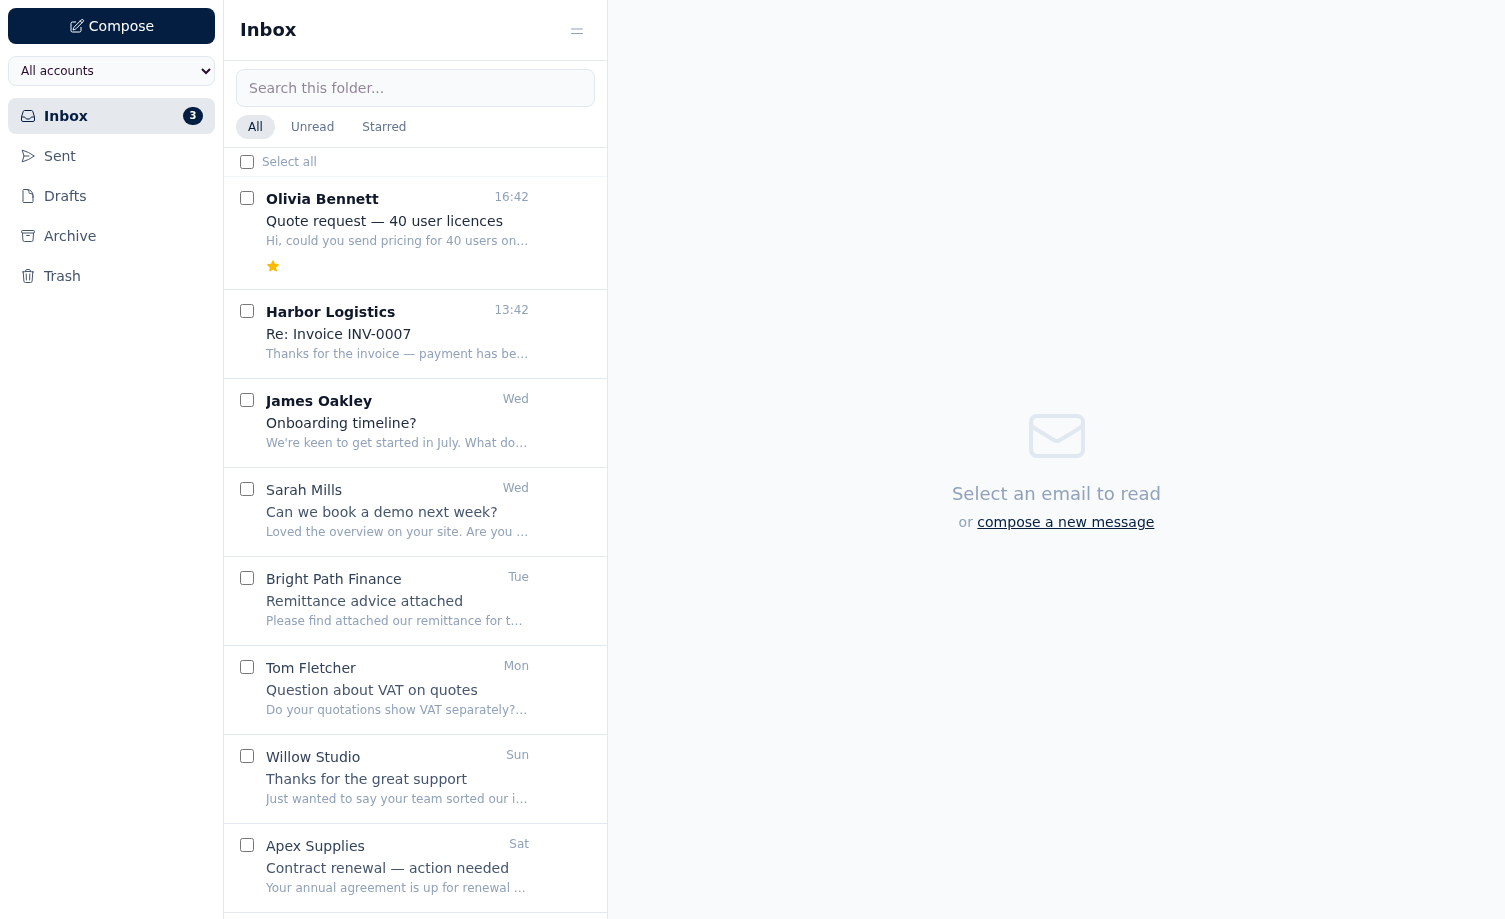
Inbox
Connect your sales inbox via Google OAuth, Microsoft OAuth, or IMAP. Inbound sales mail appears in the Inbox alongside your customer records, so you can read threads, reply, forward, compose new messages, and link conversations back to your CRM data without leaving BeagleCRM.
First-time connection
From Organisation Settings, choose Sales inbox → Connect Google or Connect Microsoft, complete OAuth, or enter your IMAP mailbox settings, then return to the Inbox. Reconnect if your provider revokes the token or update the IMAP settings if the mailbox credentials change.
Search, filter, and triage
The Inbox supports free-text search, quick filters for All, Unread, and Starred, plus account filtering when more than one inbox is connected. Open an email to mark it as read, star it, mark it unread again, or delete it.
Reply, reply all, forward, and compose
Use Compose for a new outbound email, choose the sending account, and optionally add CC and BCC recipients. From an open thread, you can Reply, Reply All, or Forward without leaving the inbox view.
Link emails to customers
If an email is not linked yet, you can create a customer directly from the sender and attach the email to that new record. Linked emails show the customer badge and let you jump straight to the customer record or unlink it later.
Clean up in bulk
The list view supports multi-select so you can select all visible emails and bulk delete them when tidying the inbox. From a support inbox, you can create a Service Desk case from the message and continue the support workflow in the Service Desk section above.
Numbers & trends
Reports & Forecast
Reports are available to organisation admins and managers. The page combines sales, quotation, revenue, invoicing, and customer-growth reporting, with built-in date range presets such as the last 30 days, last 3 months, last 12 months, and year to date. A linked forecast view takes the pipeline further with forward-looking revenue projections.
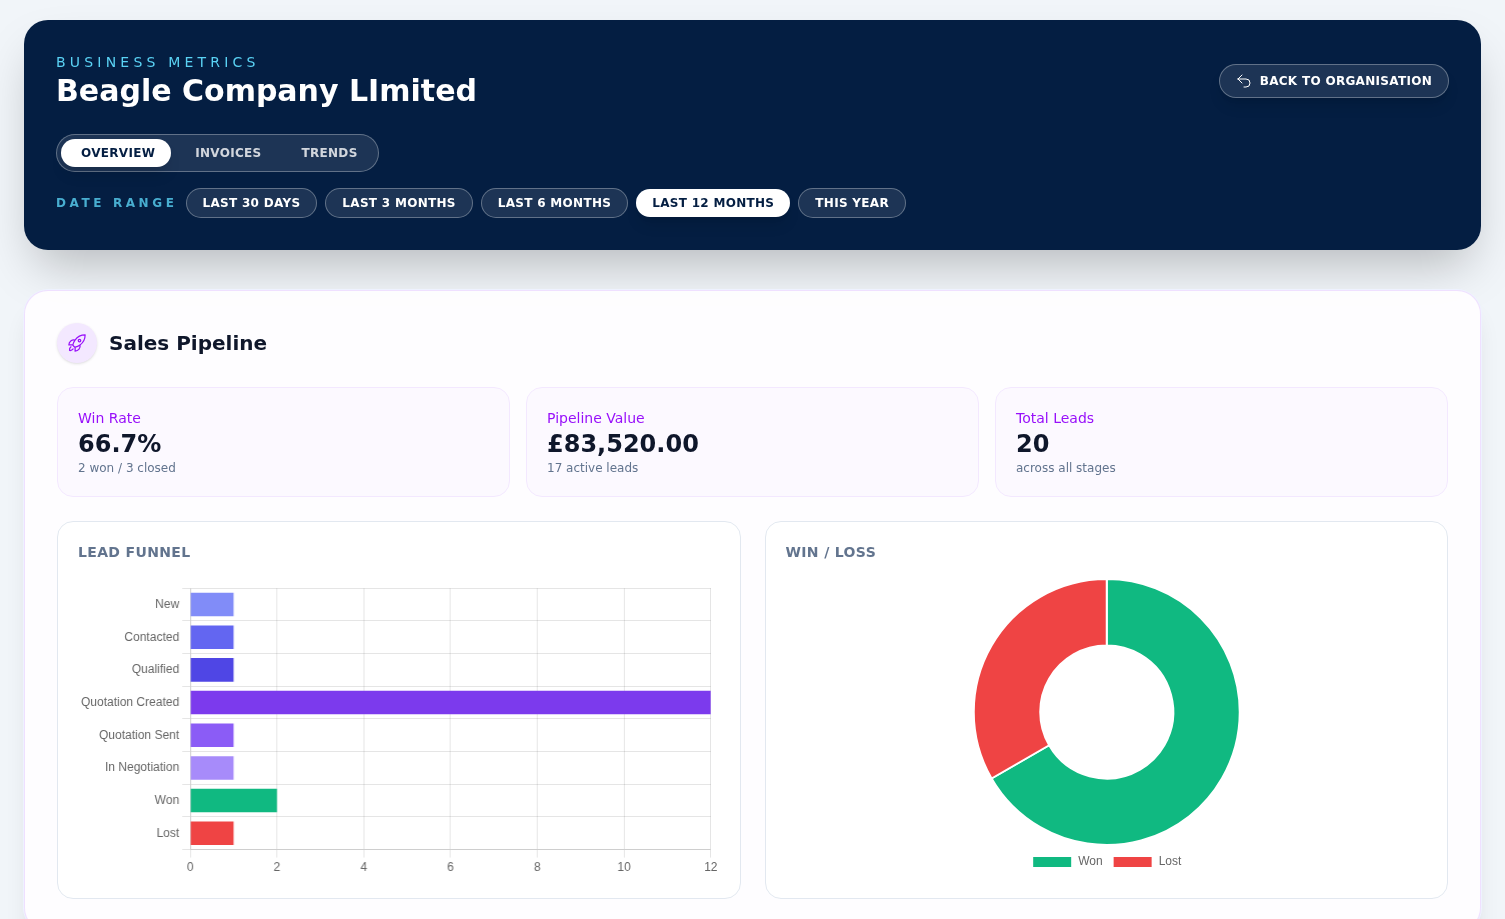
Sales pipeline and quotations
Reports include lead funnel totals, pipeline value by stage, win/loss rate, quote win rate, average deal size, average days to close, and monthly quotes sent, won, and lost.
Revenue and invoice health
Revenue reporting includes monthly revenue trend, recurring versus one-off revenue, outstanding and overdue invoices, invoice aging, pending orders, awaiting invoicing, and cancelled orders.
Customer growth
The customer section shows new customers per month, active versus inactive counts, and top customers ranked by paid invoice revenue, with direct links back to those customer records.
Forecast
Use the linked forecast view for next-quarter, 6-month, and 12-month projected revenue totals, plus a month-by-month forecast chart based on open pipeline and quotation data.
Numbers & trends
Reporting Trends
The Trends tab sits alongside Overview and Invoices on the Reports page (Reports → Trends), and is available to organisation admins and managers. Where the other tabs show totals for a period, Trends answers a different question: which way are the numbers moving? It highlights your fastest-growing (and fastest-declining) products and customers, and plots twelve months of sales, pipeline, debt and activity so you can see the direction of travel at a glance.
Trending products & customers
Two ranked tables list your top products and customers by revenue in the selected period. Each row shows the current value, the previous period for comparison, and a growth badge: a green ▲ for rising, a red ▼ for falling, and a grey dash for flat. A brand-new product or customer (nothing in the prior period) shows as +100% rather than an unhelpful “infinite” figure. A small sparkline on each row shows the recent month-by-month shape.
Drill into a single product or customer
Click any row in either table to open a detail panel with that product's or customer's monthly revenue chart over the last year. It's the quickest way to check whether a strong month was a one-off or part of a sustained trend. Close the panel by clicking away or the × button.
Trend charts
Four time-series charts cover the headline areas of the business: Sales revenue, Pipeline (open value plus won deals), AR aging (outstanding debt split into current, 1–30, 31–60, 61–90 and 90+ day buckets), and Activity (tasks completed and campaign emails sent, opened and clicked).
Date-range presets
Use the same presets as the rest of Reports — last 30 days, 3 months, 6 months, 12 months, or year to date. The chosen range sets the current window, and the growth figures compare it against the previous window of equal length, so “this period vs last” is always like-for-like.
Trends at a glance on the dashboard
Admins and managers also get a Trends at a glance panel on the main dashboard: compact revenue, pipeline and outstanding-debt cards, each with its own sparkline and growth badge, plus mini lists of the top trending products and customers. Use the View all trends link to jump straight to the full Trends tab.
How the numbers are kept up to date
Trend history is summarised once a night, so figures reflect activity up to the previous day; the current day is included live. When the feature is first switched on the history is back-filled, so a brand-new organisation may see the tables and charts fill in shortly after setup rather than instantly. All figures are scoped to your own organisation only.
Daily view
Dashboard & Activity
The dashboard is your landing page after the organisation is set up. It surfaces live workspace notifications, unassigned tasks, key pipeline and finance summaries, and navigation into the main areas of the organisation. The Activity Feed and Audit view then let you zoom in on what changed across the business.
Dashboard cards
The dashboard links directly to customers, contacts, leads, quotations, sales orders, inbox, suppliers, products, invoices, reports, and forecast. Admins and managers also see live summary figures for pipeline value, sent quotations, monthly orders, outstanding invoices, overdue amounts, and forecast totals.
Notifications and task prompts
Workspace notifications appear at the top of the dashboard and can be opened or dismissed. If there are unassigned tasks, the dashboard shows a highlighted prompt so work can be claimed quickly.
Activity feed
The Activity page is an organisation-wide event stream. Filter it by area such as leads, quotes, orders, invoices, payments, tasks, contacts, customers, or notes, and page through the timeline when you need a broader view.
Audit trail
The Audit page records detailed create, update, archive, restore, and delete changes across supported sales records. Filter by entity type, event type, user, or reference, then expand an entry to see before-and-after field values. Admins can also purge old audit records using the retention controls.
Audit detail view
Expanded audit entries show who made the change, when it happened, the record reference, the changed fields, and resolved display names for linked records where possible.
Marketing automation
Campaigns & Journeys
Campaigns let you group leads, contacts, or customers into segments, automate outreach with journeys (drag-and-drop flows of triggers, waits, emails, tasks, conditions, webhooks, and goals), and measure performance end-to-end. Marketing email is sent through a dedicated email account you connect (SMTP, SendGrid, or Microsoft 365 via OAuth). Opens, clicks, bounces, and unsubscribes flow back into the CRM when the sender supports event webhooks (SendGrid in V1 — SMTP and Microsoft 365 do not yet surface delivery events).
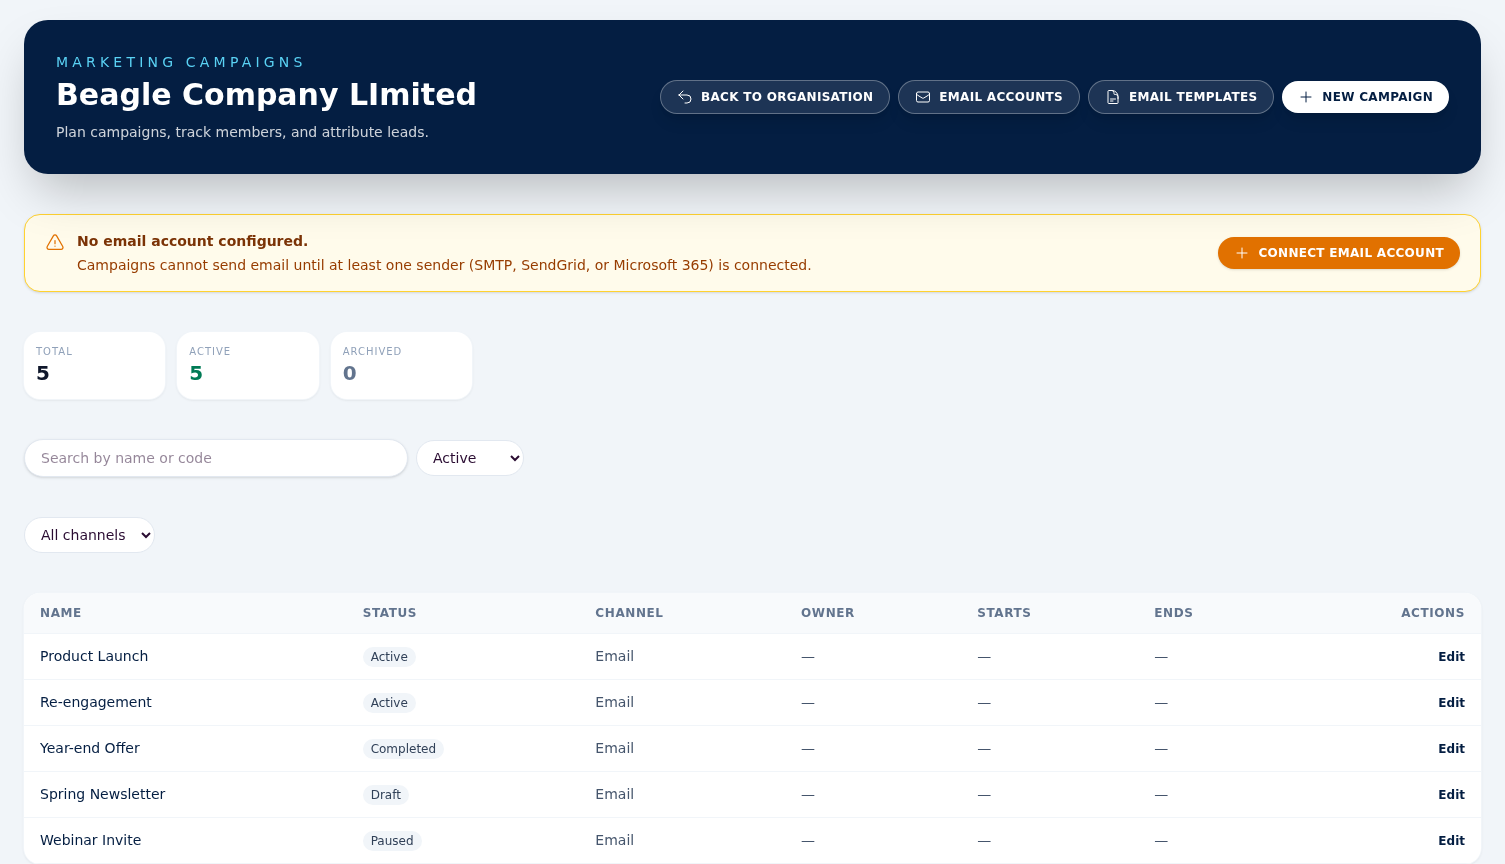
Creating a campaign
Go to Campaigns → New campaign . Set a name, status (draft, scheduled, active, paused, completed, archived), optional budget, and start / end dates. The budget feeds the ROI calculation on the Performance tab. Members can view campaigns but cannot create, edit, or archive them.
Members & attribution
Attach leads or customers to a campaign manually (lead/customer form → Campaign field) or in bulk — select rows in the Leads or Customers grid, click Add to campaign in the bulk action bar, pick a campaign. Idempotent: re-running on the same set will not create duplicate member rows. Anything created via a campaign journey is attributed automatically. The Performance tab counts leads attributed, qualified, won, lost, plus quotation / sales order / invoice rollups.
Email accounts (senders)
Before any campaign can send email you must connect at least one sender at Campaigns → Email accounts → New . Three kinds:
- SMTP — host, port, username, password, TLS mode. Use for your own mail server or a vendor that gives SMTP credentials.
- SendGrid API — paste an API key. The webhook URL shown on the account detail page must be pasted into your SendGrid dashboard so we receive opens / clicks / bounces.
- Microsoft 365 OAuth — click Connect Microsoft 365 on the new-account form to complete the consent flow. Beagle stores the refresh token securely; access tokens are refreshed on the fly. Use the Re-authenticate button on the account detail page if Microsoft rotates the token.
New accounts auto-queue a verification probe and show the result on the detail page. The page also surfaces a Sender domain health panel (SPF / DMARC / DKIM advisory) so you can spot deliverability issues before sending. Stored credentials are never displayed back — the page only shows that a value is configured.
Segments
Segments are saved filters over leads, contacts, or customers. Build conditions like lead_status in [qualified, contacted] or country = "GB". The form previews the matching set live so you can size the audience before saving. Segments power journey audiences and bulk-add to target lists.
Email templates
Reusable subject + HTML / text bodies with merge variables. The preview pane
renders sample data inside a sandboxed iframe — safe even for HTML emails
copied from external editors. Marketing-category templates must
reference {{unsubscribe_url}}
somewhere in the body — save is rejected without it. Templates can be
archived to hide them from the picker without affecting historical sends.
Journeys (drag-and-drop flows)
A journey wires together triggers (e.g. lead created), waits (timed delays), emails (send one of your templates), tasks (create a CRM task for the team), conditions (branch on a field), A/B splits, webhooks (POST to an external URL), goals, end terminators, and side-effect nodes (update_field, add_to_campaign). Open the canvas via Campaigns → Open builder from any campaign's Journeys tab.
- Edit on the draft version. Once you're happy, click Publish — the graph is validated (must have a trigger and a reachable goal) and becomes the live version. Existing enrolments keep running on the version they started on.
- Quiet hours: configure start / end in HH:MM plus an optional IANA timezone (e.g. Europe/London). Emails that would fire inside the window are deferred to the end of the window.
- Re-enrollment: each journey is either once_per_entity (default — any prior enrollment, active or terminal, blocks duplicates) or every_time (the same record can re-enrol on every trigger fire). Duplicates under the default are skipped silently.
Performance tab
Live counts of leads attributed / qualified / won / lost, quotations created / sent / accepted, sales orders, and (for admin and manager) invoiced revenue, budget, net, and ROI. Members see the activity numbers but not the financial row.
Tracking tab
Funnel by status + event (sent, delivered, opened, clicked, unsubscribed, bounced) plus per-template and per-account breakdowns. A/B variant summary appears when any journey in the campaign uses an A/B split.
Things to know before you send
- Consent and unsubscribes are honoured automatically. Recipients who unsubscribe, bounce permanently, or report spam are added to a suppression list and skipped on every subsequent send across all campaigns.
- Org-level + campaign-level + journey-level defaults. If a journey node doesn't pick an explicit sender, we fall back to the journey default, then the campaign's default email account, then the org default.
- Daily and hourly quotas can be set per email account. Sends past the quota are snoozed automatically until the window resets.
- Webhook signatures are verified. Forged event traffic is rejected at the controller before any DB write. Signature verification is currently implemented for SendGrid only — SMTP and Microsoft 365 senders do not push event data back, so opens / clicks / bounces will not populate for those kinds in V1.
-
Open + click tracking
are wired automatically when a template is rendered: every
<a href>is rewritten through Beagle's signed click-redirect, and a 1×1 open pixel is injected at the bottom of the HTML body. - List-Unsubscribe support. Every marketing send carries RFC 8058 one-click unsubscribe headers in addition to the in-body link, so Gmail and Outlook surface the native unsubscribe affordance.
Per-organisation data fields
Custom Fields
Beagle CRM ships with a fixed set of customer and lead fields that cover most cases. Custom fields let your organisation capture extra information that matters to your process — account managers, industries, renewal dates, qualification scores, anything not in the built-in schema. Definitions are scoped to a single organisation, so other tenants never see your fields or values.
Where to find it
Open the organisation menu in the top-right of any
page and choose Custom Fields. The link is
visible to admins and managers. Direct URL: /orgs/<slug>/settings/custom-fields.
Who can do what
- Admin — create, edit, archive, hard-delete, fill in values.
- Manager — create, edit, archive, fill in values. No hard-delete.
- Member — read-only on values.
Creating a field
Click + New custom field. Fill in:
- Label — what humans see (e.g. Account Manager).
- Field key — auto-generated from the label. Used in the import template column header. Editable until first save, then locked.
- Description — optional help text shown next to the field on forms.
- Field type — pick once, cannot be changed afterwards. Choose carefully.
- Options — only for Single select / Multi select. Add value/label pairs.
- Visibility — toggle whether the field appears on the add form, the detail page, the customer list (as a column), and whether it is active.
- Behaviour — Required on create blocks save when empty. Important highlights the field amber on the detail page when empty (without blocking).
Available field types
- Text — single-line string
- Long text — multi-line string
- Number — decimal number
- Money — decimal with 2 dp
- Date — ISO date
- Yes / No — boolean
- Single select — one value from a list
- Multi select — many values from a list
- URL — validated URL
- Email — validated email
- Phone — phone number
Filling in values
On the customer form, switch to the Custom Fields tab (only shown when at least one field exists for customers). On a lead, scroll to the Custom Fields section near the bottom of the form. Save persists the values transactionally with the parent record — if a value fails validation, the whole save rolls back.
Detail pages
Customer and lead detail pages show an Additional Information panel with the configured custom values. Empty Important fields render with an amber label as a soft prompt to fill them.
Customer list columns
Tick Available as list column on a definition to surface the field in the customer grid. Each column gets a built-in filter typed for the field (text, number, date) and you can pick the same filters as for built-in columns.
Imports
The customer import template includes one column per active
customer custom field, prefixed CF: <Label>. Re-download the template after creating new
fields. Bad values surface as per-row errors so the rest of the
import keeps running.
Archive vs delete
Archive hides the field everywhere but keeps stored values in case you need them. Delete (admin only) permanently removes the field and every value attached to it; the confirmation prompt warns you. Use the Stats button first to see how many records hold a value.
GDPR / anonymisation
When an admin anonymises a customer, all custom field values for that customer are cleared in the same transaction as the built-in personal fields. Field definitions are unaffected; other customers’ values remain.
Things to know before you start
- Field type is permanent. If you pick the wrong type, archive the field and create a new one with the right type.
- Field key is locked after first save. It is used in import templates — pick something stable.
- Removing a select option that is already in use will cause the next save of those records to fail validation. Clear or migrate the values first.
- Required on create only fires when the field is also visible on the add form.
- Lead custom fields are not yet surfaced as columns on the lead grid — on the roadmap.
Account protection
Security & sign-in
Signing in
Two ways to start a session: email magic link or email + password. Magic-link is the recommended path — we email you a one-tap link, valid for 15 minutes and single-use. Password sign-in is available once you set one in Settings → Password.
After your first factor verifies, you will be prompted for your six-digit authenticator code. Codes refresh every 30 seconds — we accept the previous and next code to tolerate small clock skew, so you usually do not need to wait for a fresh one.
Two-factor authentication (within 14 days)
Every account must enrol an authenticator app (Google Authenticator, 1Password, Authy, Bitwarden, etc.) within 14 days of sign-up. During the grace period a banner at the top of every page reminds you and counts down the days remaining. After 14 days, sign-in will be blocked until enrolment is complete.
- Open Settings → Two-factor authentication.
- Scan the QR code with your authenticator app, or copy the secret manually if scanning is not possible.
- Enter the 6-digit code from the app to verify enrolment.
- Save the ten recovery codes — they are shown only once. Store them in a password manager or print them.
Recovery codes
- Ten codes per enrolment. Each one is single-use.
- Shown once at enrolment and once after regeneration.
- If you lose access to your authenticator, use a recovery code from the sign-in challenge page.
- Regenerate from Settings → Two-factor authentication if codes run low. The old set stops working immediately.
Lost authenticator AND recovery codes
Contact support. We will verify your identity out-of-band (a callback to a known number, recovery email, or another trusted channel) before resetting your two-factor settings. After the reset, you will be required to enrol a fresh authenticator on your next sign-in. You will also receive an email recording who reset your 2FA and when — if you did not request the reset, contact support immediately.
Disabling two-factor
Two-factor is mandatory for every account — you cannot turn it off and keep using the CRM. The Disable button on the settings page exists only so you can switch authenticator apps: disable, then immediately re-enrol with the new app.
Sessions, sudo, and time display
- Sessions are valid for 14 days of activity. Idle sessions expire automatically.
- Sensitive actions (changing your password, changing your email, disabling 2FA) require a fresh sign-in within the last 10 minutes. You may be asked to re-authenticate.
- All timestamps in the app are shown in UK local time and follow British Summer Time automatically.
- Use Force sign out in your settings to revoke every other device immediately if you suspect a session is compromised.
Your data
Export your data
You can download a full copy of your organisation's data at any time. This is useful for your own backups, for moving to another system, and for answering data-portability requests under UK GDPR. Only organisation admins can run an export.
How to export
- Go to Settings and find Export all your data.
- Click Export all my data. We'll start preparing it in the background.
- When it's ready we email you a secure download link. For your security you'll need to be signed in to download, and the link stops working after 7 days.
What's in the download
A single ZIP file containing one CSV per area, so it opens straight into Excel, Numbers, or Google Sheets:
- customers.csv — your customer accounts
- contacts.csv — people linked to customers
- leads.csv — your sales pipeline
- invoices.csv — issued invoices
- quotations.csv — quotes
- sales_orders.csv — sales orders
- tasks.csv — your tasks
The export is a snapshot taken when you click the button. Projects and notes aren't included yet — let us know if you need them.
Power user
Keyboard shortcuts
Move around the CRM without taking your hands off the keyboard. Shortcuts are ignored while you are typing in a text field, search box, or note editor, so they never interfere with normal input. Press Esc to close any dialog or cancel a pending chord.
Global search — press ⌘ K (or Ctrl K)
Open the command palette from anywhere and start typing to jump straight to a record. It searches across your customers, contacts, leads, quotations, sales orders, invoices, projects, cases, and products at once — plus the main navigation destinations. Results only ever include records from your current organisation.
Use ↑ ↓ to move through results, Enter to open the highlighted one, and Esc to close. You can also click the Search button in the header.
Go to anywhere — press G, then a letter
The G key starts a navigation chord. Within 2 seconds, press one of the keys below to jump.
| Shortcut | Goes to |
|---|---|
| GD | Dashboard |
| GL | Leads |
| GC | Customers |
| GO | Contacts (peOple — C is taken) |
| GP | Projects |
| GT | Tasks |
| GM | Marketing campaigns |
| GQ | Quotations |
| GS | Sales orders |
| GI | Invoices |
| GU | Suppliers |
| GR | Reports |
| GA | Activity feed |
| GH | Chat |
| GN | Inbox |
On the current page
Single keys that act on the page you are looking at. They work on index pages (lists) and show pages (details) wherever the corresponding action is available.
| Shortcut | Action |
|---|---|
| N | Create new (lead, customer, invoice, etc.) |
| E | Edit the record on a show page |
| / | Focus the search field |
Within any list
| Shortcut | Action |
|---|---|
| J | Move focus to the next row |
| K | Move focus to the previous row |
| Enter | Open the focused row |
| X | Toggle select on the focused row |
Accessibility notes
- Shortcuts use unmodified keys only. Browser combinations like Ctrl+L or ⌘+K are never intercepted.
- The cheat sheet opens as a native dialog with focus trapping — screen readers announce it, and Esc always closes it.
- A high-contrast focus ring marks the focused list row, and rows scroll into view automatically when you press J or K.
- Shortcuts are disabled while typing in any input, textarea, contenteditable region, or select — so a stray N in a note will never trigger a new record.
We're listening
Help & feedback
Stuck on something, or have an idea that would make Beagle CRM better? You can reach our team without leaving the app. Click the Help button (the lifebuoy icon) in the top navigation bar from any page, then choose what you'd like to send:
Support requests
Something not working as expected, or you're not sure how to do something? Raise a support request. Give it a short subject and describe what's happening — the more detail, the faster we can help.
Suggestions
Got an idea for a new feature or an improvement to an existing one? Send it as a suggestion. We read every one — your feedback shapes what we build next.
What happens next
- Everything you send appears under Support so you can track its status — open, in progress, resolved, or closed.
- When our team replies, you'll get an email and see the reply in the conversation thread on the request. You can reply back in the same thread to keep the conversation going.
- Only people in your organisation who raised a request can see it — your requests are private to you.
Sign in and open any organisation to find the Help button in the top bar.
Need More Help?
If Organisation Settings still appears after you have saved Address line 1 and Postcode, check that the fields are not blank and save again. For anything else, contact support and include the organisation name you are trying to set up.