
Customer setup guide
Adding customers
Manual or import
You can add customers one at a time or import them in bulk. The customer screen includes both options, so new organisations can either start clean or bring over an existing customer list.
Add one customer manually
Open Customers and use New Customer to create a new record. You can capture the core details straight away: Customer / Business Name, email, telephone, mobile, address, postcode, county (or state / province / region outside the UK), country, and website. The Customer / Business Name is required, and BeagleCRM assigns the current user as account manager unless you choose someone else.
Import customers in bulk
Use Template to get the current spreadsheet, complete it, then open Import and upload the file. Imports use Excel .xlsx files up to 5MB, with a maximum of 250 customers per file — split larger lists into batches.
Details, identifiers, and custom fields
The customer form has tabs for Details, Identifiers, and, when configured, Custom Fields. Use Identifiers for VAT number, Companies House number, and DUNS number. Custom field values save with the customer, so required custom fields must be completed before the record can be saved.
Validation and duplicates
BeagleCRM checks email format, phone numbers, website URLs, county, Companies House number, VAT number, and DUNS number. Business names must be unique within the organisation. Email addresses are deliberately not unique — one person's address legitimately belongs to several customer records — so a repeated email raises a non-blocking duplicate warning you can save through. See Duplicate detection.
Upload, preview, then import
After upload, BeagleCRM validates the rows before anything is created. The preview shows row numbers, key customer details, how many rows are valid, and which rows need attention. Only rows marked Ready are included when you confirm the import.
Download failed rows for review
If any rows fail validation in the preview, use Export errors to download a spreadsheet of the problem rows and error messages. The file is delivered as customers-import-errors.xlsx so you can correct the source data and re-upload it.
Import progress and partial success
Once you confirm, the import runs with a live progress indicator. Valid rows can be imported even if other rows fail, so a bad record does not block the whole batch.
Custom field columns
The customer template includes the standard columns plus one column for each active customer custom field, labelled CF: Field Label. Re-download the template after adding or archiving customer custom fields so the spreadsheet stays in sync with your organisation.
Import template columns
The customer import template includes these fifteen headings: Name, Business Name, Email, Telephone, Mobile, Address, Postcode, County, Country, Website, Marketing Email Consent, Marketing SMS Consent, Marketing Post Consent, Marketing Consent Basis, and Marketing Consent Source. Any active customer custom fields are appended as extra CF: columns.
Onboarding automation during import
If your organisation has the Customer onboarding automation enabled, the preview step lets you choose how imported customers should enter onboarding. The default is Skip onboarding for imported customers, which marks each valid imported customer as Onboarded and creates no checklist tasks.
Run onboarding for an import batch
Choose Run onboarding for imported customers only when the imported customers should go through your normal checklist. Those records stay in Draft and the default onboarding template creates checklist tasks for the batch.
Flagging VIP customers
Tag any customer as a VIP to make them easy to spot across the workspace. There are three ways to set it:
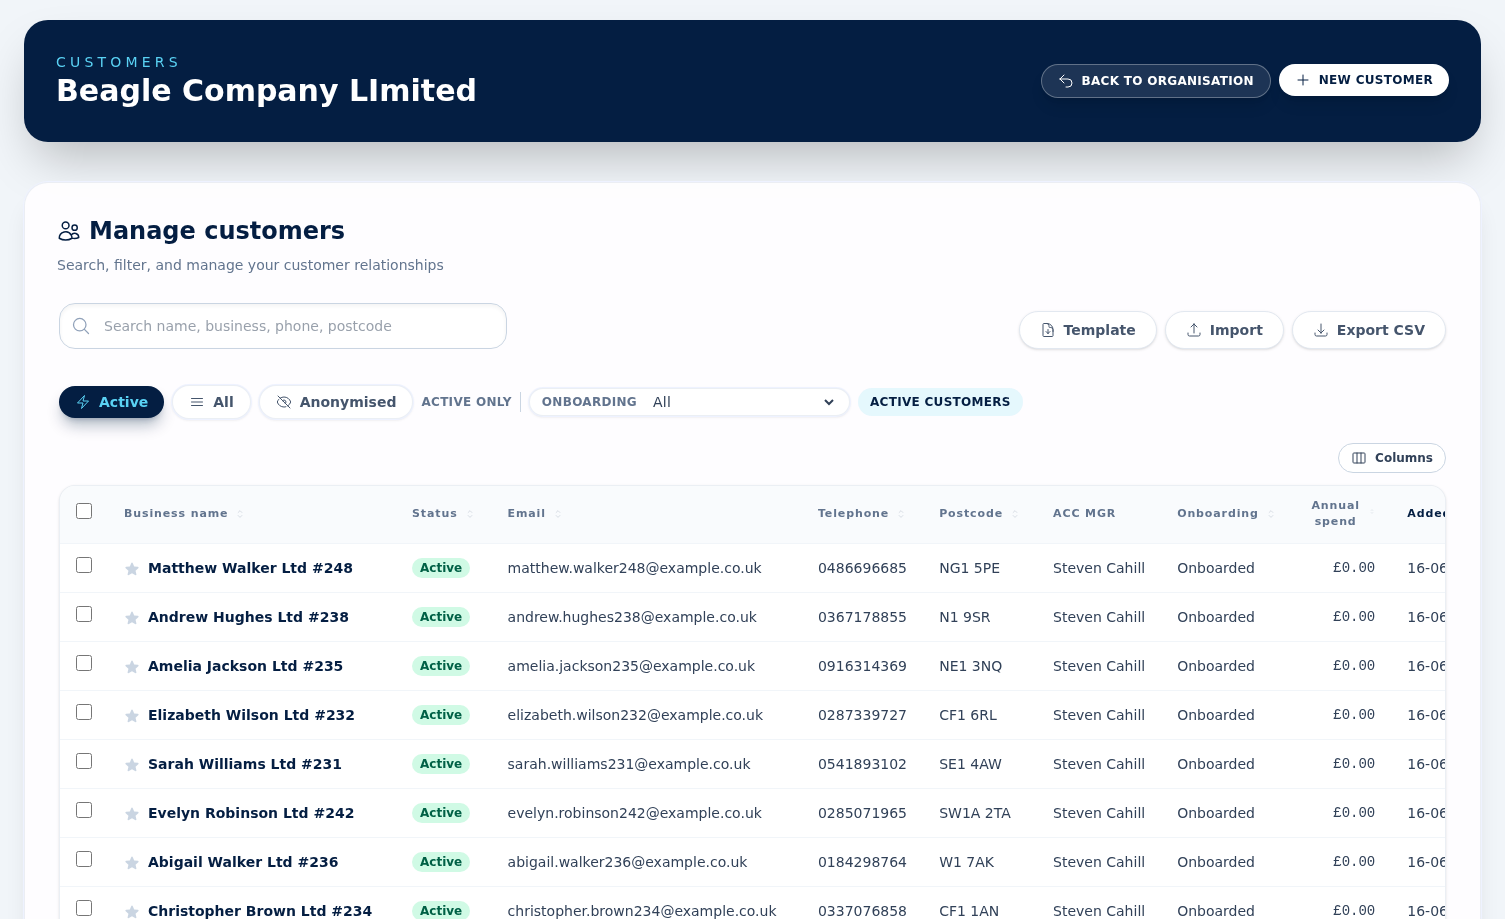
- In the customer grid, click the star to the left of the business name. Gold = VIP, grey = not VIP.
- On the customer detail page, click the large star next to the customer name in the hero.
- In the customer edit form, tick the VIP customer checkbox in the Details tab.
VIP does not change pricing or permissions. It is mainly a visual flag, but it is also available to marketing: campaign segments can filter on VIP, and a journey step can set or clear it. Use it to draw the team's attention to strategic accounts.
Search, filter, and export
The customer list searches name, business name, phone, postcode and county, plus a full-text match across the record. Filter by Active, All, onboarding status, and, for admins, Anonymised. Columns is the column picker and nothing else — it shows or hides table columns. Sorting and page size are on the table itself, and Export CSV is a separate button in the toolbar, which downloads the currently filtered view.
Active, inactive, and anonymised customers
Admins can mark a customer inactive when a relationship pauses, by unticking Customer is active on their record. Nothing is deleted: the customer keeps every quotation, invoice, project, case, and note, but drops out of the default list — switch the filter to All to find them — and can no longer be picked when raising a new quotation, invoice, project, or case. Ticking the box again reactivates them. Admins can also anonymise a customer for data-protection requests: you confirm by typing ERASE, and the record shows Erasure requested until the wipe completes. Anonymised records are hidden from normal lists but can be viewed through the admin-only Anonymised filter and restored by an admin if needed. There is no permanent delete for customers: the invoices and other accounting records that reference them have to survive, so anonymisation is the destructive action.
Bulk actions
Select one or more customers from the list (checkbox column on the left, or the header checkbox for "select all on this page"). When at least one row is selected a sticky bar appears above the table with five actions:
- Assign owner — reassign the account owner across every selected customer. Agent or admin.
- Add tags and Remove tags — apply or strip tags across the whole selection in one go.
- Add to campaign — push every selected customer as a campaign member. Idempotent: re-running on the same set won't create duplicates.
- Archive — set every selected customer to inactive. Admins only, so the button is absent for anyone else. Reversible from the customer's edit screen.
There is no bulk delete for customers, and no single-record delete either — customers are never hard-deleted. The destructive action is anonymisation, done one record at a time from the customer page and admin-only. (Leads do have a bulk delete.)
Batches up to 25 rows run in the foreground and the page refreshes when done. Larger batches queue a background job; a flash banner reports progress and a final summary with the success/failure split. Selection clears whenever you change a filter, sort, or paginate.
Heads up: permission gates apply per row. If a row fails authorization mid-batch the foreground path rolls the whole batch back; the background path skips that row and keeps going.
Marketing consent
Each customer record carries per-channel marketing consent: email, SMS, and post, together with a
Lawful basis
(Explicit consent (PECR opt-in), Soft opt-in (existing customer,
similar product),
Legitimate interest (post only)
or Contract) and a free-text Consent source / provenance
label. The customer edit form does not show these fields — customer consent is set
by import (the five consent columns in the template) or through the API. The
Marketing Consent panel with the toggles, basis dropdown and provenance field is on
the contact and lead forms. Wherever consent is set, the provenance label is
required whenever any channel is opted-in — if a staff-entered save leaves it blank,
the system auto-fills staff: <your name> @ <ISO timestamp>
and writes that label into the per-event audit trail.
Every flip (opt-in or opt-out) writes an append-only row to the consent audit log with channel, action, lawful basis, IP, user-agent, actor, and the source label. BeagleCRM only ever appends to that log — there is no update or delete path in the application, which is the control you are relying on. At the database level DELETE and TRUNCATE are revoked from PUBLIC, and updates are deliberately left possible so a retention scrub or an erasure request can strip the IP, user-agent and evidence from old rows. Note that revoking from PUBLIC does not bind a role that owns the table or holds a direct grant, which is the usual single-role deployment — so if you need to show a regulator that the log is tamper-proof at the database as well as in the application, ask your administrator to revoke DELETE and TRUNCATE from the application role explicitly.
Double opt-in (optional). Turn on Settings → Profile → Marketing consent → Require confirmed (double) opt-in for marketing emails for a stricter, provably-consented list. With it on, anyone newly marked as email opted-in is sent a one-off confirmation email and is held back from campaigns until they click the link; people who haven't confirmed are skipped. Off by default — soft opt-in is lawful under UK PECR for existing-customer relationships.
Spreadsheet import: the customer import template has five additional columns — Marketing Email Consent, Marketing SMS Consent, Marketing Post Consent, Marketing Consent Basis, Marketing Consent Source. The Source column is required for any row with a true opt-in or the row is rejected at preview time (no silent fallback). Filename + row number are recorded into the audit evidence.
Tags
Tags are a shared per-organisation pool of labels that flow across customers, contacts, and leads — one chip, one colour, one rename point. Use them for whatever the fixed columns don't capture: industry vertical, office region, campaign cohort, "needs onboarding call". From the bulk action bar pick Add tags or Remove tags to apply to many rows in one go.
To read the list back the same way, use the Tags pill above the grid. It lists every active tag with the number of customers carrying it; tick as many as you like and the grid narrows to the customers that have all of them, with Clear to drop the filter. It is a working filter for the session, not a saved preference — reload the page and you start from every customer again. The pill only appears once your organisation has at least one tag.
Admin: tag CRUD lives at Settings → Tags. Pick from a 10-colour palette, add an optional category to group related tags, archive to hide without losing history, delete (admin-only) cascades through every tagged record.
Duplicate detection
Same customer entered three different ways (web form, spreadsheet import, "couldn't find it in search so I re-created it") is the most common cause of stale activity and triple-sent marketing emails. BeagleCRM flags possible duplicates as you type and surfaces an admin scan list of pairs already sitting in the database.
Four match strategies run on every check: exact email (case-insensitive), name similarity (fuzzy trigram match on business or person name), phone number (compared on the last 10 digits, so +44, 020, and 02079460958 all collide), and postcode + name (a strong UK B2B signal for "same office of the same company"). Each match shows up as a coloured badge with a confidence score.
Admin: Settings → Duplicates lists every customer or contact pair the engine spots in your org. Click Compare & merge to open the side-by-side view: pick the winner's value for each field where the two records differ, hit confirm, and the loser is deleted with every child record (leads, quotations, sales orders, invoices, notes, tasks, consent events, taggings, custom fields) re-parented to the survivor. Merges write a dup_merge audit row with the full pre-delete snapshot. Agents and admins can view the scan; admin-only can confirm a merge (because the loser record is deleted).